Are you ready to dive into the world of the Naruto Anime series? We are here to take you to the Narutouniverse, where you’ll learn about the “Naruto Shippuden Main Characters’ Drawings”.
You will get amazing and mind-blowing knowledge about each character with us. So are you guys excited to start this roller coaster Naruto characters drawing journey with us?
Let’s get started with the Step by Step Naruto Characters Drawings.
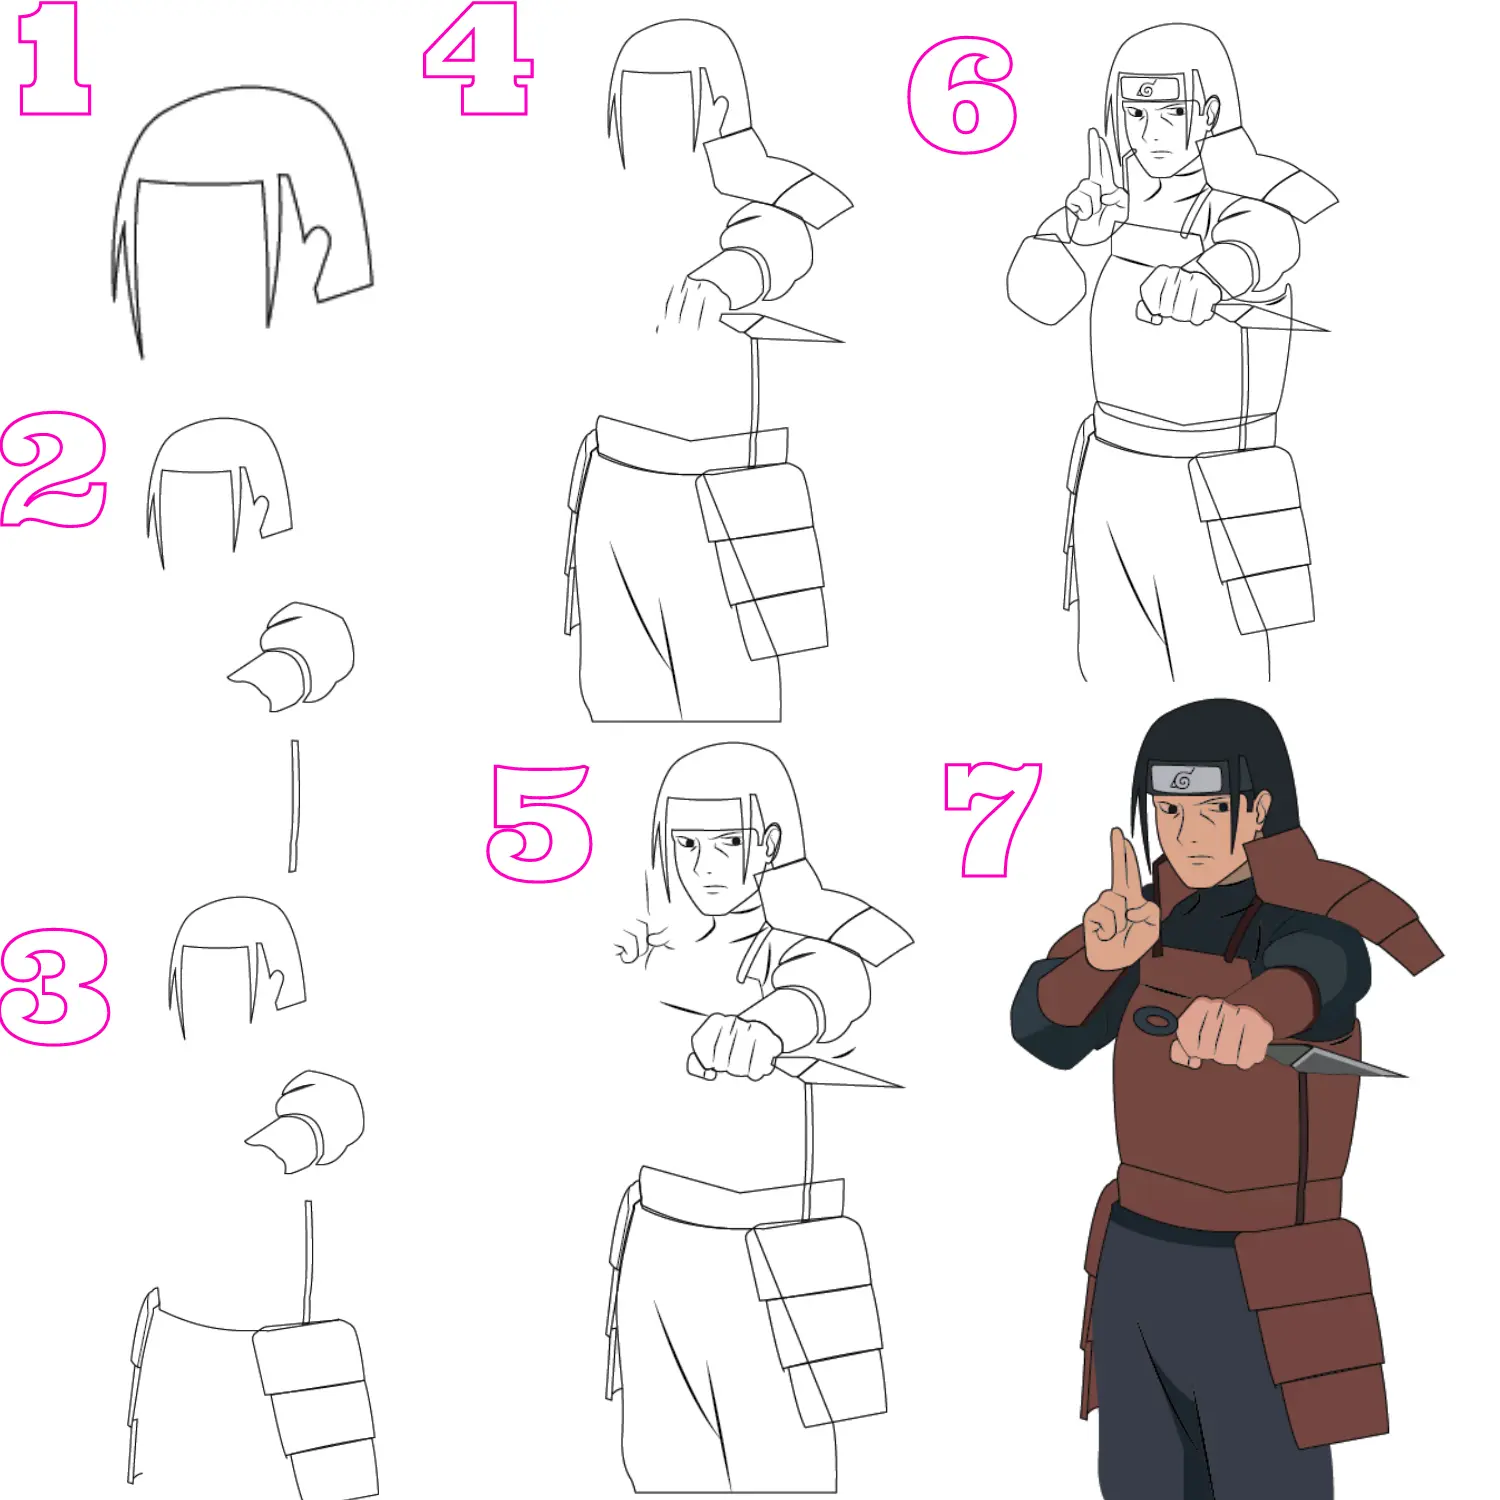
Itachi Uchiha is one of the most powerful and skilled ninjas in the Naruto series. He is a ninja from the hidden leave village. He is also one of the members of the Akatsukiorganization.
So, are you eager to learn his drawing tutorial with us after knowing about him? We have brought out the simplest, easiest, and most attractive drawing tutorial for you.
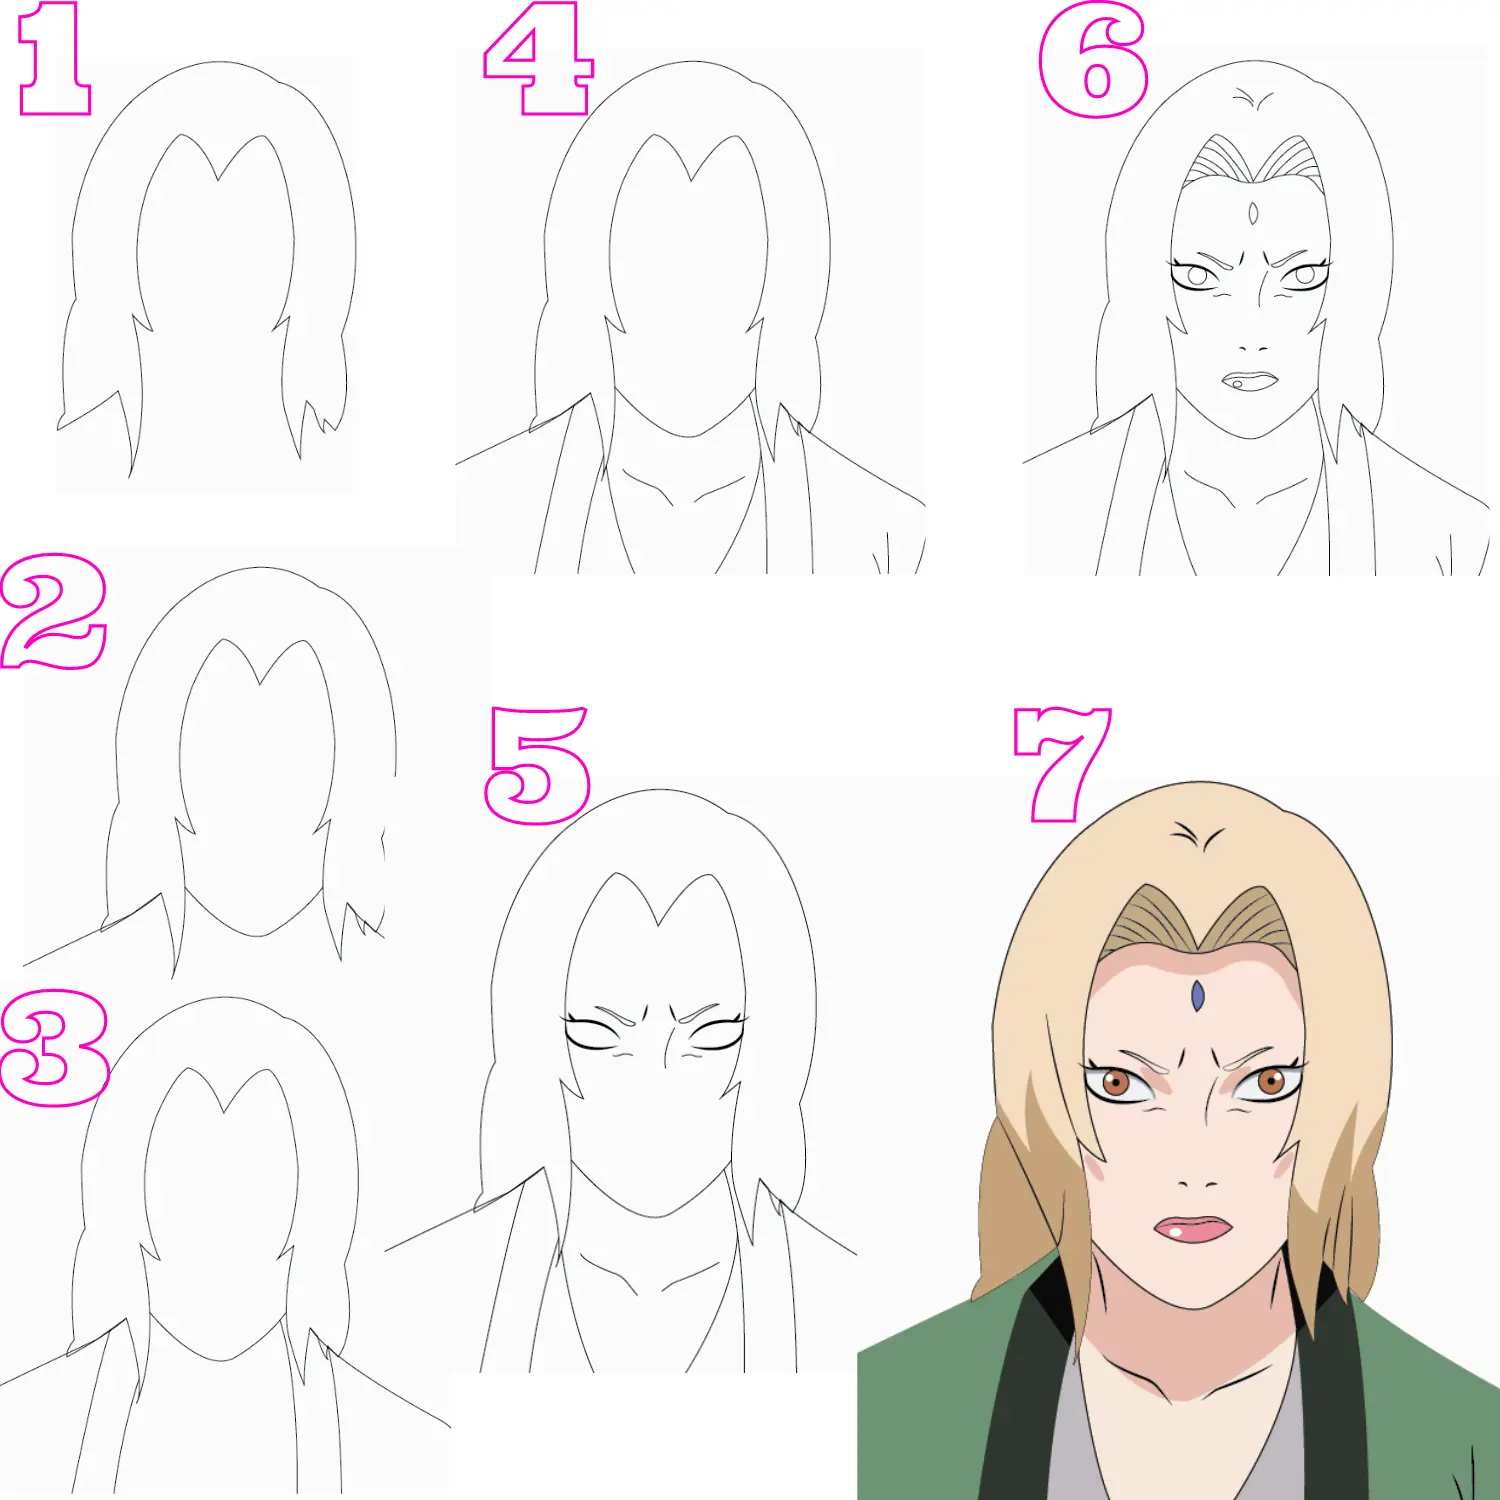
Step 01: First of all, you need to draw his hair.
Step 02: After hair drawing, it’s time to outline his face.
Step 03: Don’t forget to draw his facial features.
Step 04: Head Protector adds persona to Itachi’s personality; please take care of the minor details while drawing his head protector.
Step 05: This step is all about outlining Itachi’s Neck.
Step 06: Hurrah, we are about to complete Itachi’s drawing. Let’s dress him and add charm to his personality.
Step 07: Draw his inner dress and patterns.
Step 08: You have successfully drawn the most powerful and skilled ninja from the Naruto Series. Add some colors, and you are done with the drawing.
Follow the link below for a detailed step-by-step guide
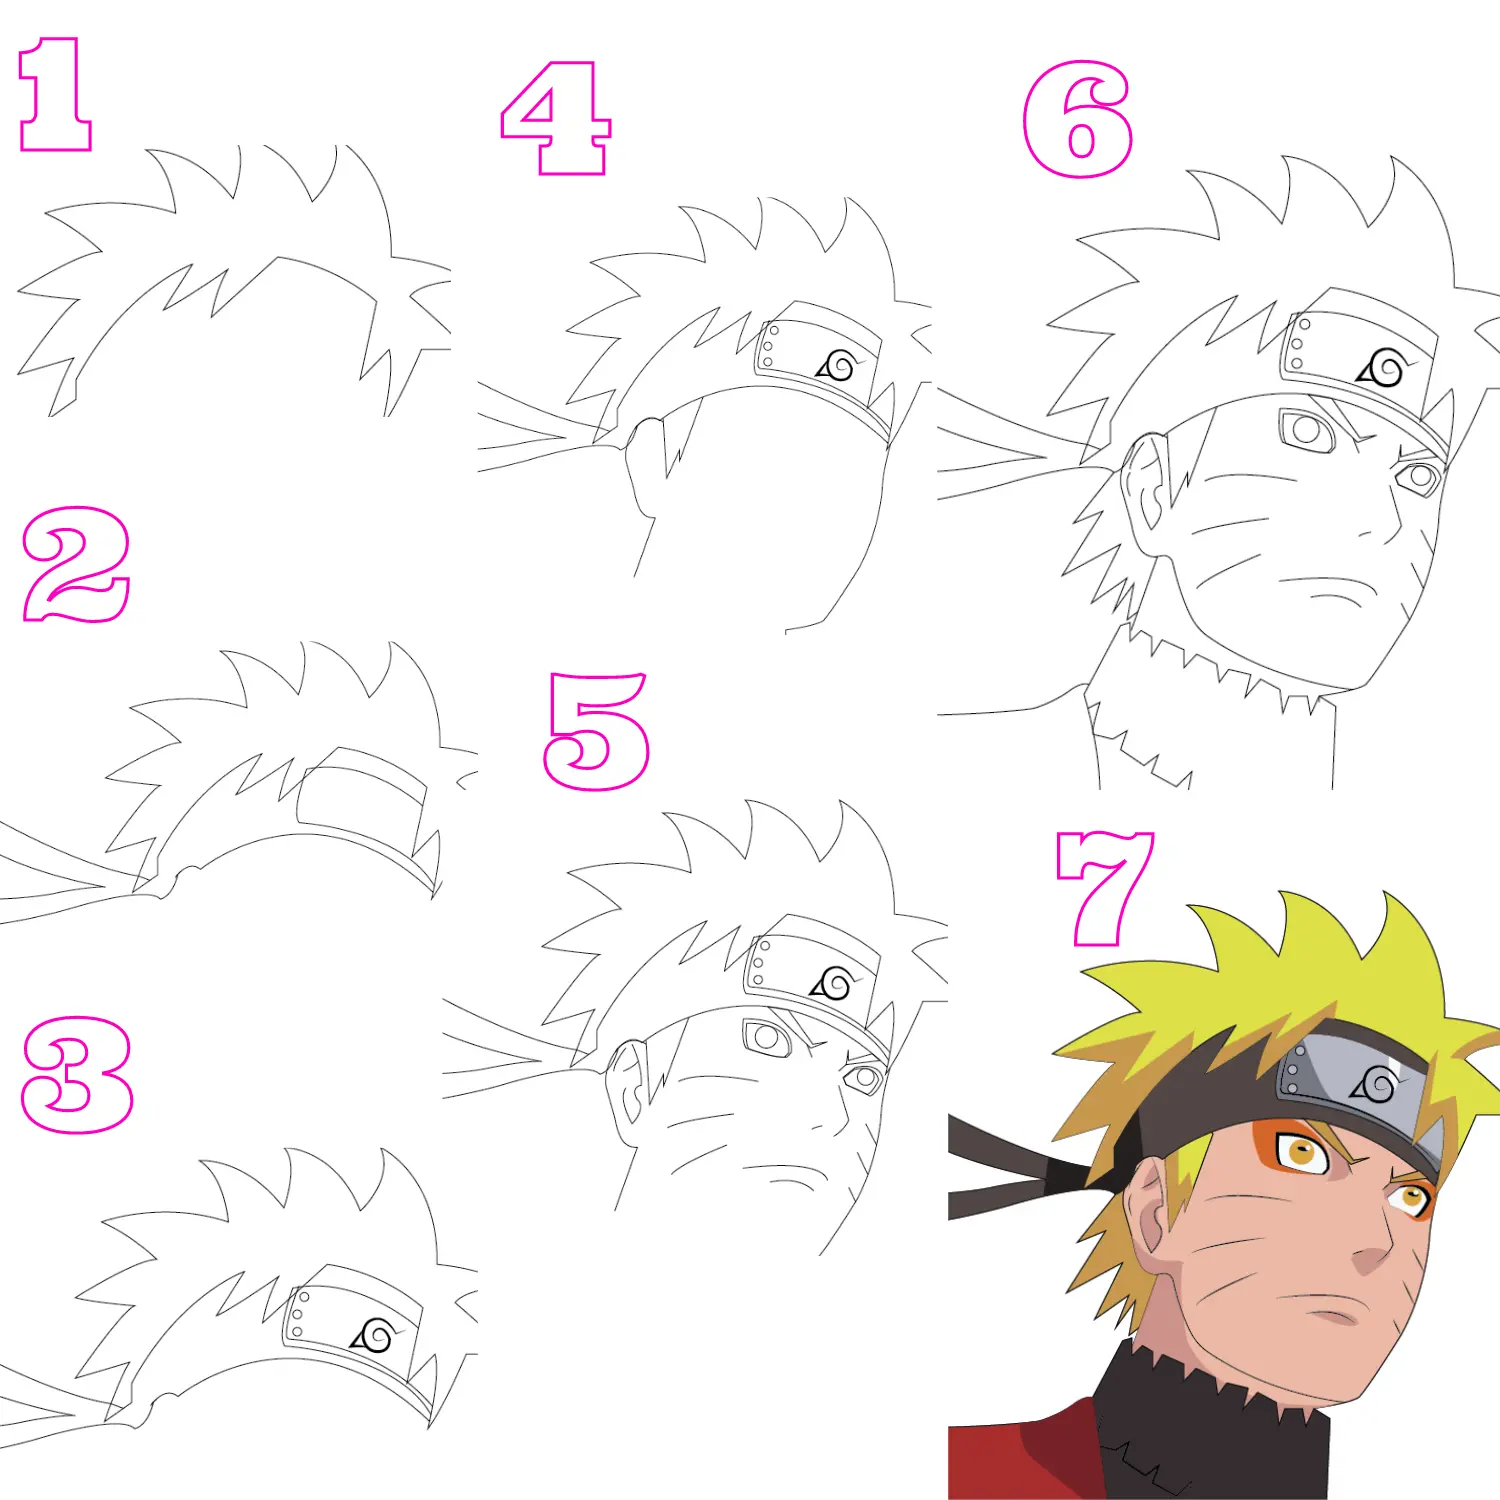
Naruto Uzumaki (Naruto’s Main Character) is the hero of the Naruto anime series. He is one of the leading characters and always a fan-favorite in the whole series.
His intelligence, skills, and unbeatable talent made him one of the loudest ninjas.
As always, he is a fan favorite, so all his fans love to draw his character, and that’s why we bring out the step-by-step drawing tutorial for you to make his drawing easier and more fun filing for you.
Step 01: First of all, draw his hair
Step 02: Now, in the second step, outline his head protector
Step 03: Add his village symbol on his head protector
Step 04: Draw the shape of his face, and don’t forget to add detailing to his face
Step 05: Now draw his facial features to give a perfect look to his drawing
Step 06: Make a prominent shape of his ear
Step 07: Complete Naruto’s face in this step
Step 08: We are done with his face now. Let’s move forward and Sketch his neck and dress to complete his character.
Step 09: At the end most important thing is to add color to his drawing so that your sketch looks presentable.
Follow the link below if you want to see a detailed step-by-step guide
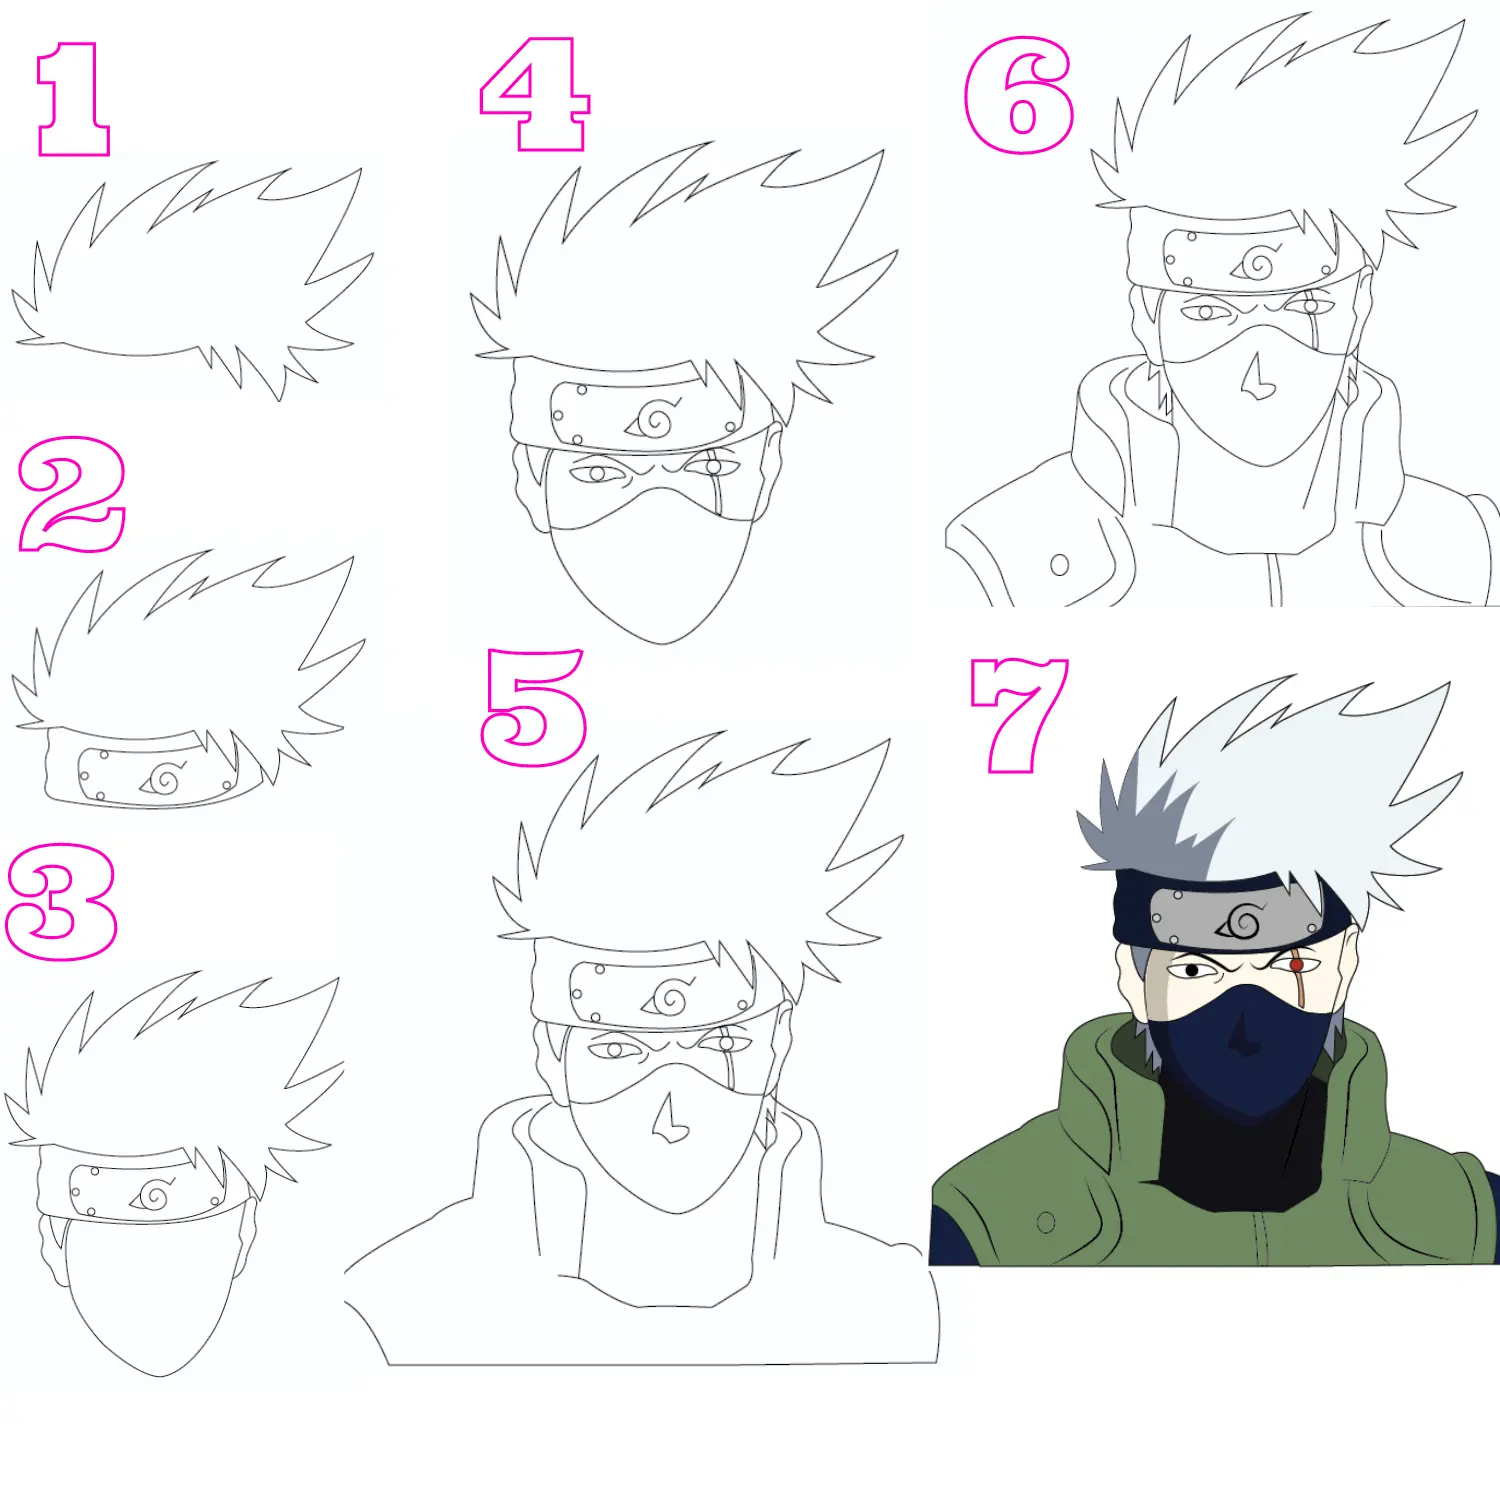
Kakashi Atake is one of the fictional characters in the Naruto anime series and has been highly popular because of his exceptional qualities and abilities. He is also known as the leader of the team.
Don’t you want to draw his character? Of course, without any doubt, the fans would love to draw his character, and with our drawing step guide, the character of Kakashi becomes very easy for you; it will be cheery on the top.
Step 01: First of all, we will start drawing his hair
Step 02: Now, when we are done with hair, the second main thing is his head protector. So draw it
Step 03: Face is an important part of a character so now draw his face and ears
Step 04: When you’re done with the face, draw his eyes and mask
Step 05: Moving forward, dress him and also add facial features to his face
Step 06: Now move to the upper body part and draw his neck
Step 07: When you’re done with the neck then, add the collar of his dress
Step 08: Now complete one side of his dress
Step 09: Finally, complete the other side of his dress, and now your character is perfectly dressed up.
Step 10: Remember to color him because coloring adds charm to his drawing
Follow the link below for a detailed step-by-step guide
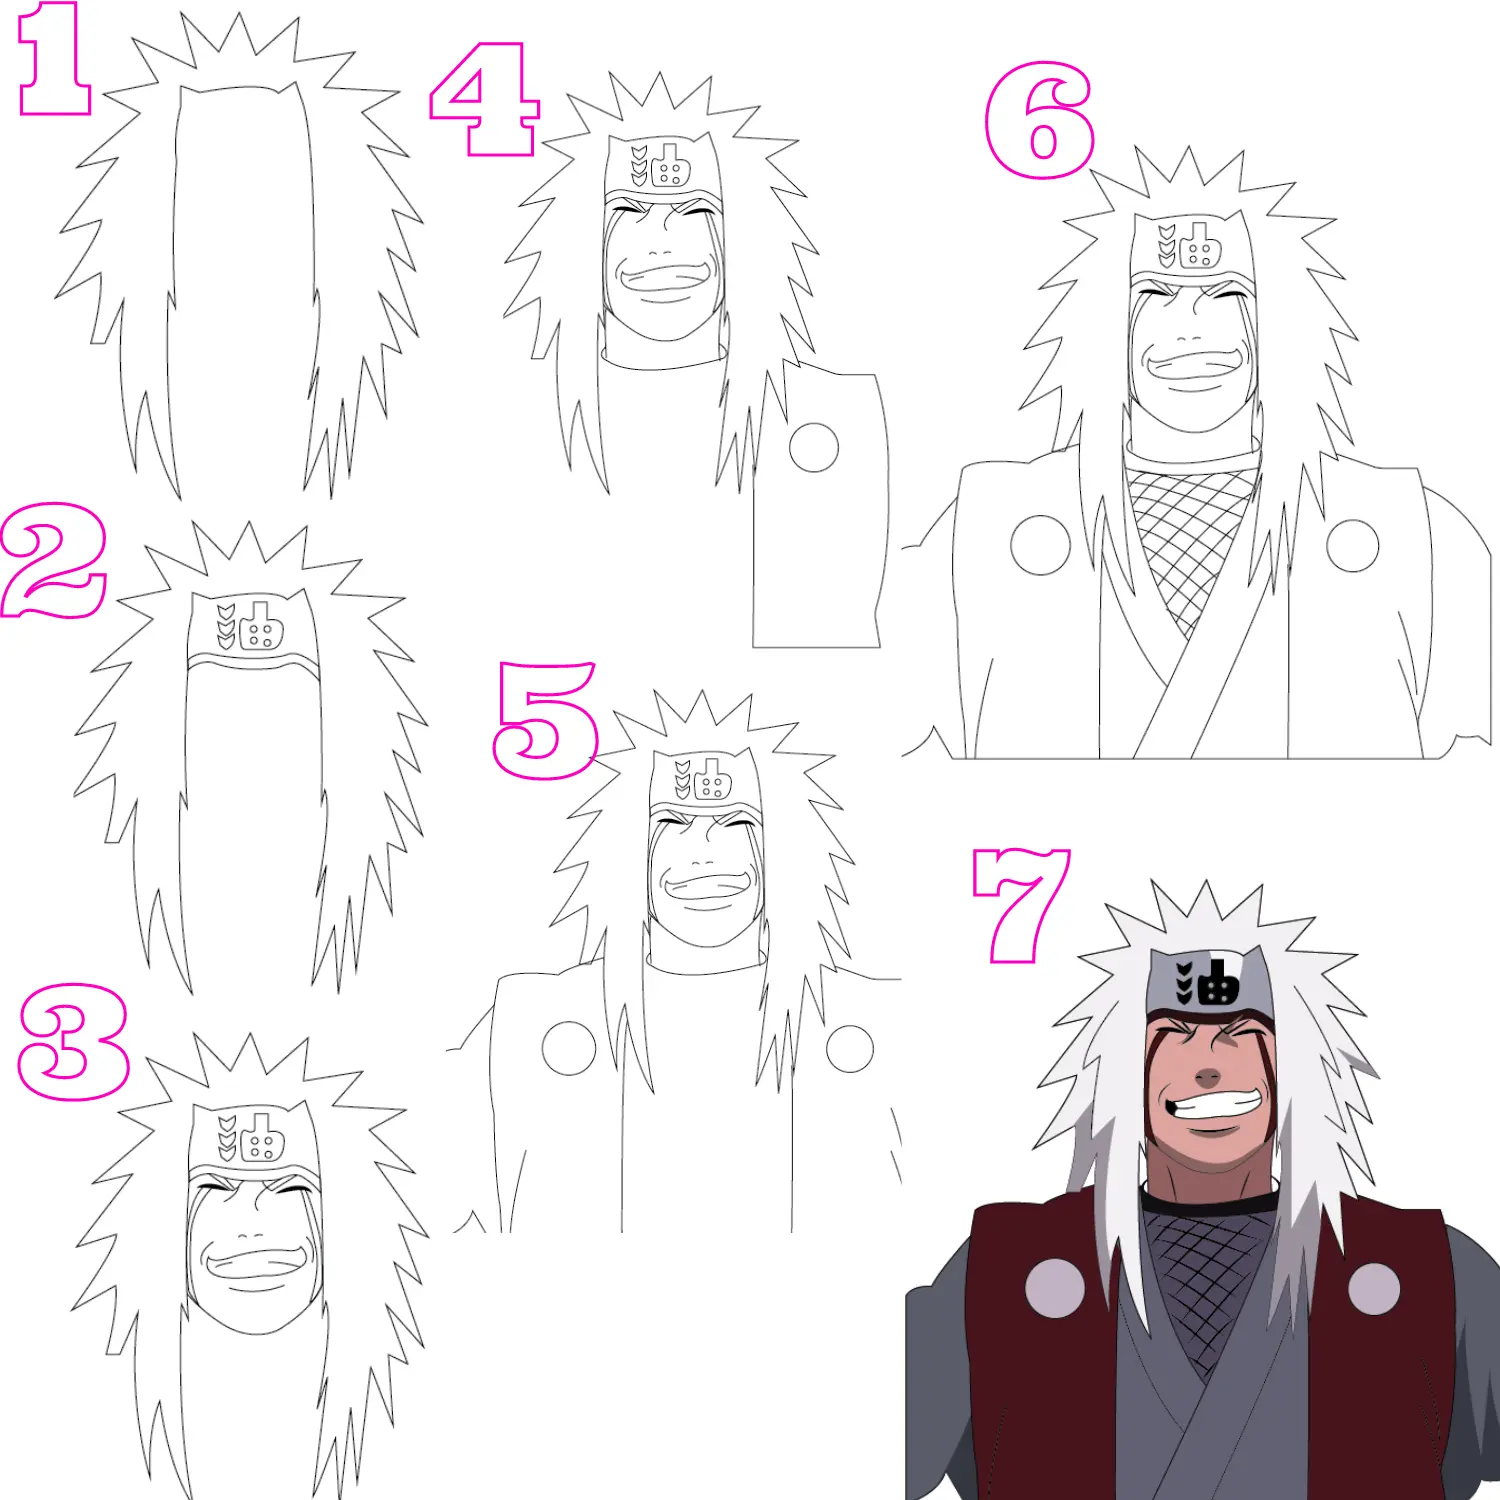
Jiraiya is one of the exceptionally powerful and legendary Sanninsfrom the Naruto series.
He is one of the greatest ninjas of his generation, and his goal is to bring peace to the world. While drawing with us, it’s very easy for you to follow our step-by-step guide and learn about Jiraiya.
Step 01: In the first step, perfectly draw his hair because it’s the first step of your drawing
Step 02: Now draw the shape of his head protector
Step 03: The main important thing is its face and features, so don’t forget to draw it
Step 04: When you’re done with the face, now draw the upper body part, which draws his neck, and secondly, draw his dress as well.
Step 05: The dress is an important part of Jiraiya’s personality, so draw one side of his dress
Step 06: Now draw the other side of his dress and also draw his hand
Step 07: Now, to complete Jiraiya’s drawing, give a final look to his dress
Step 08: Now, when the dress is complete, add lines in his dress to make the dress prominent
Step 09: Now, last but not least, draw his dress collar, and you’re completely done with it
Step 10: Finally, the wait is over, and we are going to do coloring in our character drawing
Follow the link below for a detailed step-by-step guide
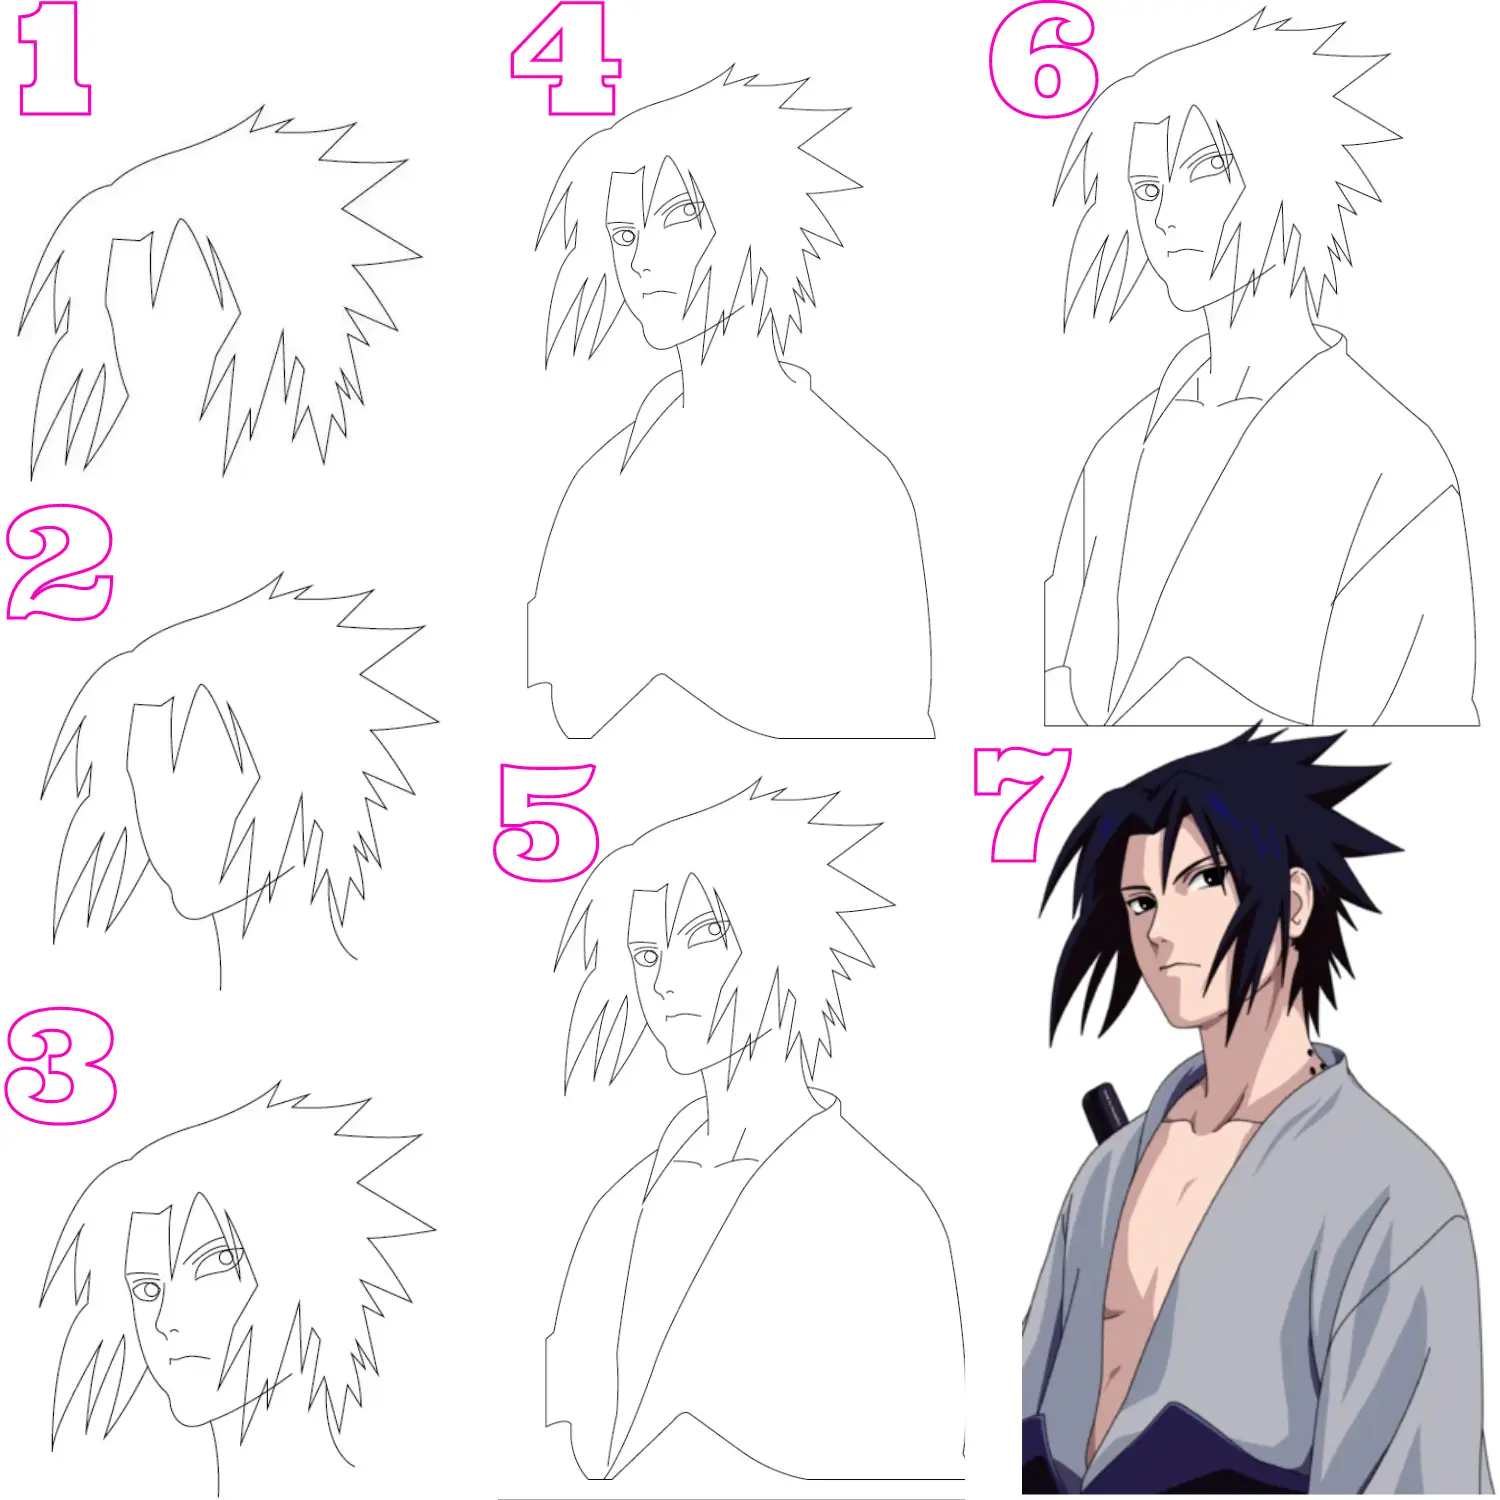
When his brother slaughters all the members of their clan, Sasuke’s mission is to take revenge by killing his brother Itachi.
The revenge story of Sasuke is interesting and attracts the readers to artistically portray his character. Our drawing tutorial on Sasuke will help everyone sketch his character creatively and dramatically
Step 01: First of all, we started with Sasuke’s spiky hair
Step 02: Moving forward, we will see the shape of his face and neck
Step 03: To add expressions to his character, draw his facial features
Step 04: Now draw his upper body part, draw his shoulder, and also draw the dress of your character
Step 05: When you are done with the dress then, don’t forget to Sketch his chest and his dress collar
Step 06: Then finally draw his dress sleeves
Step 07: Wow, you’re done with the drawing of the most amazing character of Sasuke. Get ready to add color to his drawing.
Follow the link below for a detailed step-by-step guide
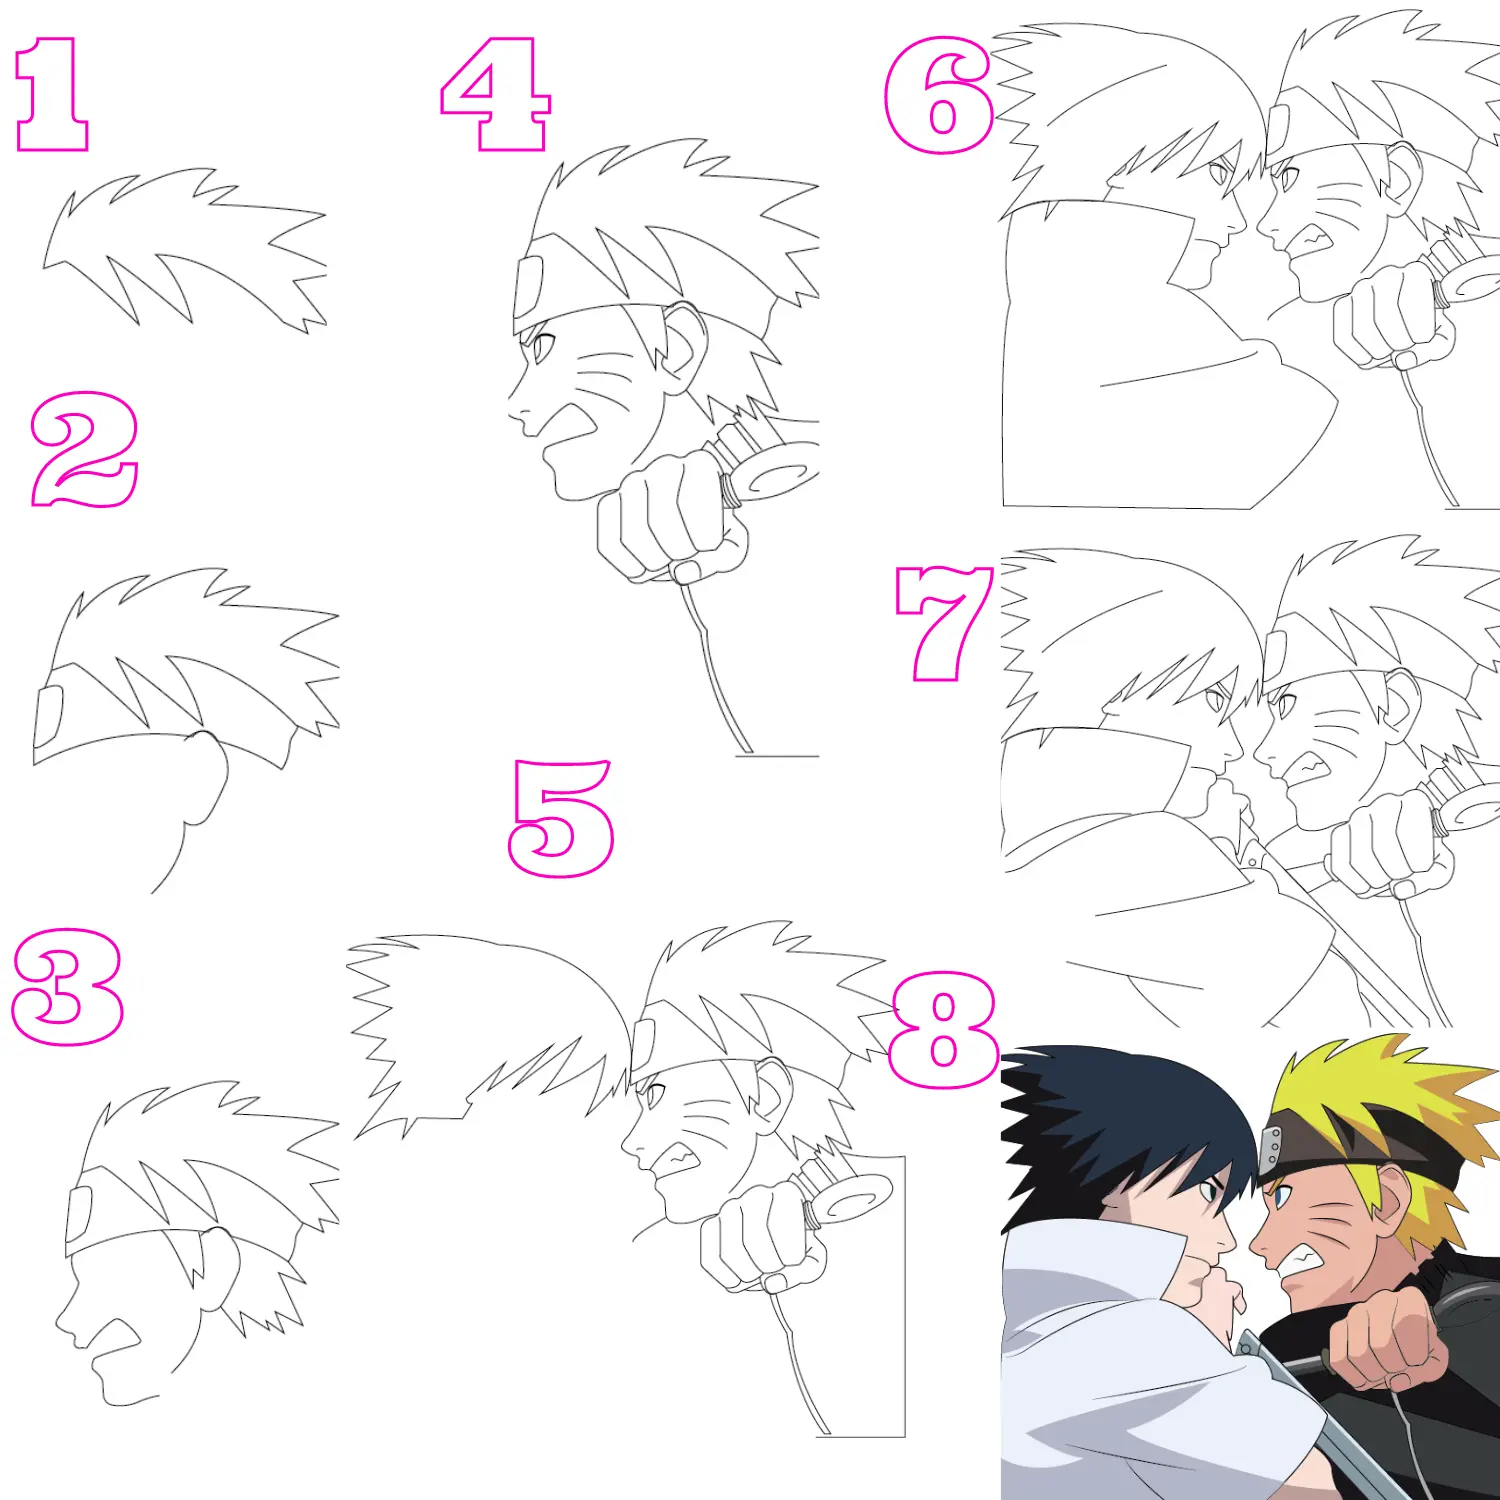
When we listen to Naruto vs Sasuke, it always gives us goosebumps that who is a better fighter.
To prove who is stronger, they constantly fight to determine who is the best ninja in fights, and we sketch out their fighting scene in our tutorial for the fans of the Naruto series.
The simplified step-by-step guide will help you draw them dramatically and enjoy it while drawing them.
Step 01: In the first step, draw the hair of the superhero, Naruto
Step 02: After hair drawing, it’s time to draw his headband, ear, and jaws
Step 03: Don’t forget to outline the shape of his face
Step 04: To add expressions, draw his facial features
Step 05: When done with the face, now it’s time to draw his hand
Step 06: So, in this step, are you excited to draw his weapon, which he used in fights? Now draw it and also draw his dress
Step 07: Now it’s Sasuke’s turn. Draw Sasuke’s hair
Step 08: After that, draw his face and add facial features
Step 09: Finalize the shape of his dress
Step 10: Draw his dress collar and arms
Step 11: When you are done with the dress, now is time to draw his hand and sword.
Step 12: Finalizing him by drawing his elbow
Step 13: You’re done with the most amazing character fighting scene drawing. Get ready to add color to the drawing to see the final image.
Orochimaru is a legendary Sannin with a complex personality, his life objective is to learn all the secrets of the world, and he is a villain and a part of the terrorist organization Akatsuki.
So drawing the villain is a hell of fun because their character makes the story interesting, and with us, it will be so much fun to draw him because our steps are easy to draw, and the detailing we add in every step will help to sketch out his character easily.
Step 01: First of all, start drawing his hair.
Step 02: After hair, now it’s time to draw his face
Step 03: Now draw his eyes
Step 04: When done with eyes, don’t forget to draw his facial features
Step 05: At this step, draw his upper body
Step 06: Now it’s time to draw his crinkles
Step 07: After the above step now is the time to dress him, so draw his dress.
Step 08: Finally, at this point, you have completed the drawing of Orochimaru. Now fill in the color in his picture.
Zetsu is one of the members of the criminal organization Akatsuki.
He is also one of the antagonists with a dual personality known as white Zetsu and black Zetsu.
He is also famous as a plant guy due to his special abilities. It’s so much fun to draw him.
His interesting appearance will grab the audience’s attention, and our unique and exclusive drawing guide will help you draw him in easy, simple steps.
Step 01: In the first step, Zetsu draw his plant-like shapes
Step 02: After completing the plant-like shape, it’s time to draw his jaws
Step 03: Don’t forget to draw his face and hair
Step 04: To add expression, draw his facial guidelines
Step 05: Now it’s time to draw raw his collar and the center part of his dress
Step 06: We are finally done with the face, hair, and jaw. Now draw his dress and clouds
Step 07: Add more clouds on his dress
Step 08: It’s time to draw his hand
Step 09: When the hand is done then, draw his hand sleeves
Step 10: Again, draw his sleeve and hand
Step 11: The amazing character of Zetsu is finally completed. Now fill in the colors in his character.
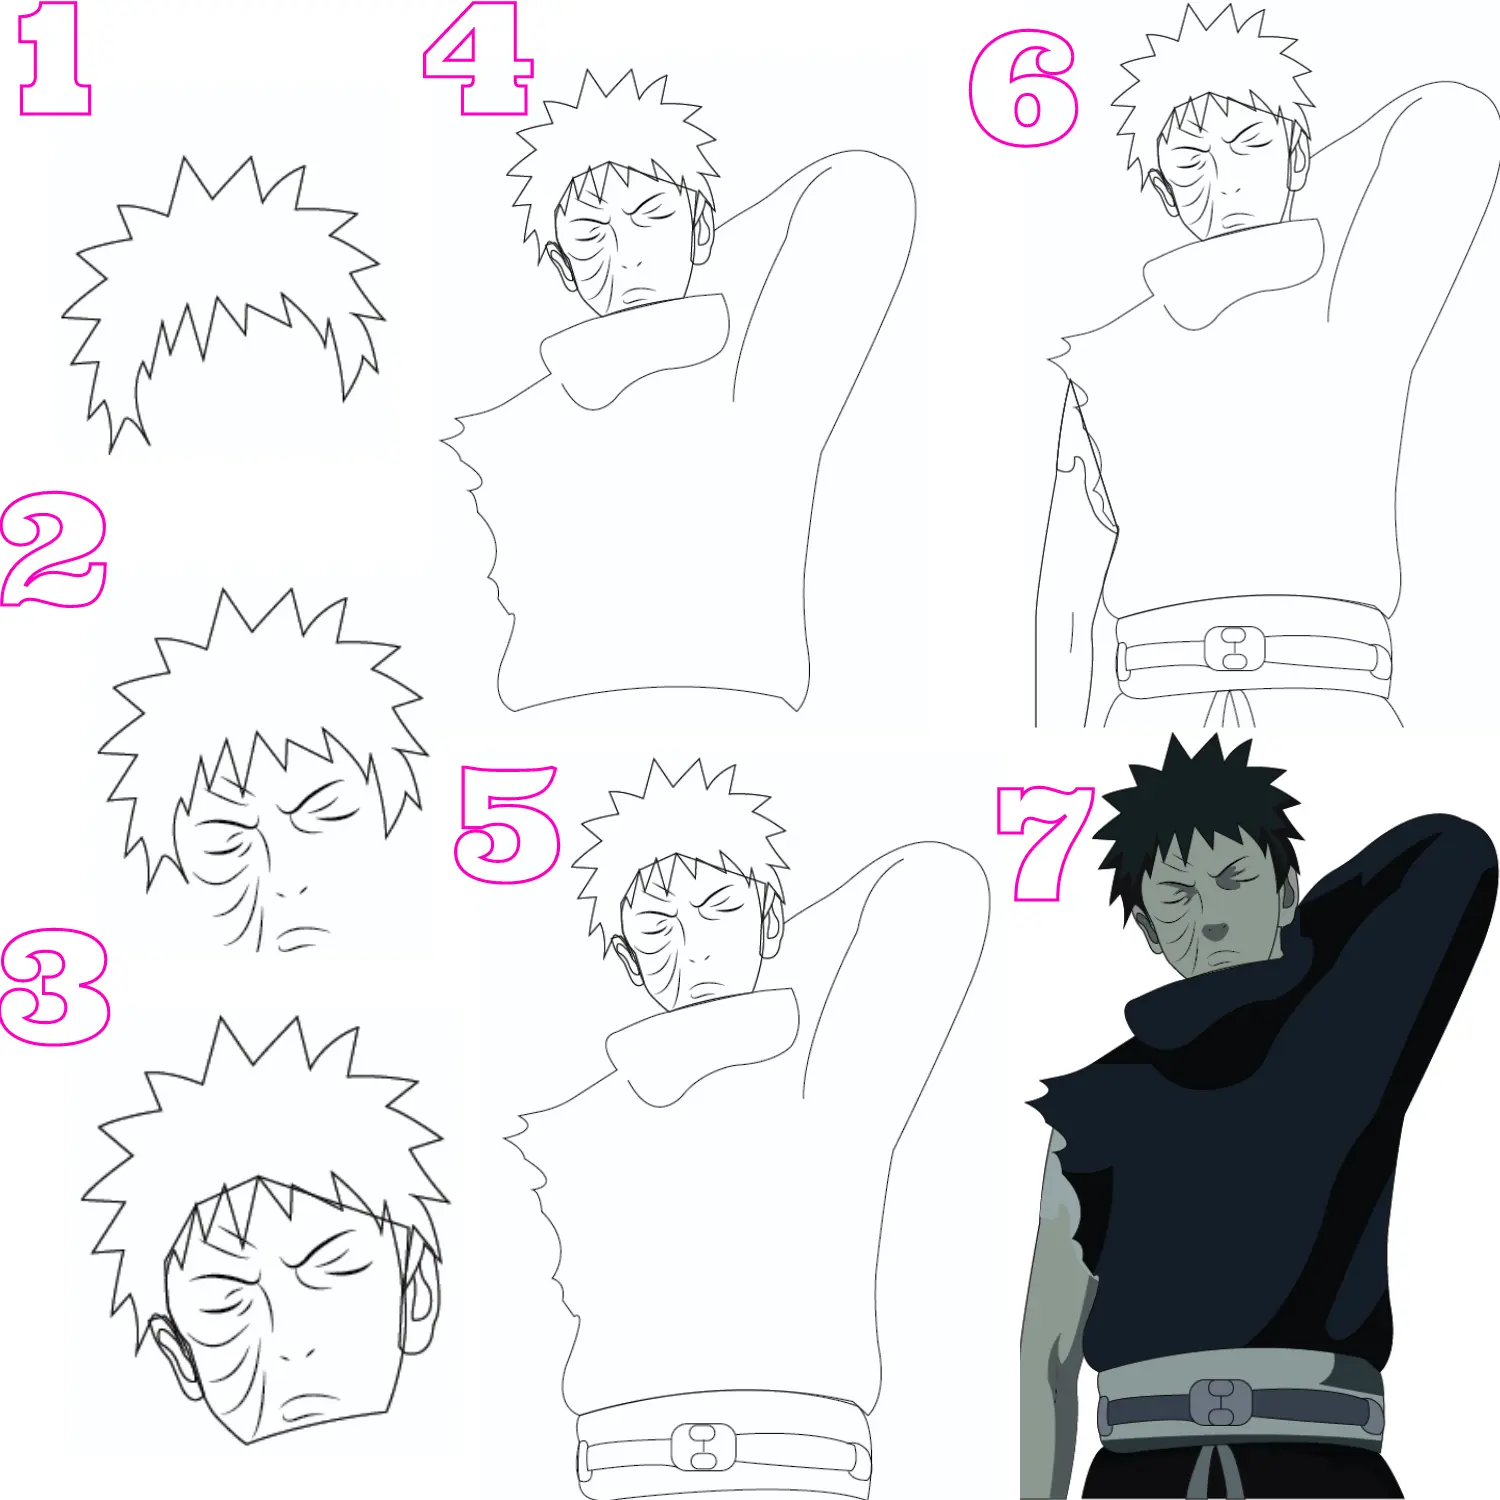
Obito Uchiha is a member of the Uchiha clan, and he is a boy full of life, but after witnessing the death of his loved one, he turns into the biggest villain in the Naruto series.
To draw his tragic character, we are here to guide you with our step-by-step drawing guide.
Step 01: In the first start with his hair
Step 02: Done with the hair, now draw his features and scars
Step 03: Don’t forget to outline his face and ears
Step 04: When done with face and hair, then it’s time to sketch his dress and the shape of his hand
Step 05: Now move to the lower body part and draw his belt
Step 06: After that, draw his lower part
Step 07: In the end, it’s time to draw his left hand, and your drawing of Obito Uchiha is completed
Step 08: Do coloring in his picture to add grace to his personality.
Pain Naruto is the best and main villain in the Naruto anime series; he belongs to the Uzumaki clan.
He was the leader of the Akatsuki.
He convinces the fans to listen to his story. His extremely remarkable personality encourages the audience to draw his character. Our drawing steps about Pain Naruto help everybody to draw his character and appearance.
Step 01: Start with painful hair. Draw his hair
Step 02: Now it’s time to draw his headband
Step 03: Remember to draw his head protector symbol and focus on minor detailing while drawing his symbol.
Step 04: Done with the head, it’s time to draw his face and hair ends
Step 05: In this step, you all need to do is to outline his collar and ears
Step 06: To add charm to Naruto’s personality, dress him properly; draw his dress
Step 07: After that, draw his eyes
Step 08: Moving forward, sketch his mouth and nose
Step 09: Ears piercing is an important part of Naruto’s face, so don’t forget to draw his ears piercing both sides
Step 10: Wow, you’re done with the drawing of the main villain of the Naruto series. Now add colors to his character.
Kurama is a powerful, mighty monster known as a mindless nine-tailed creature in the Naruto anime series.
He is used as a tool of war in the series.
It’s quite difficult to draw the nine-tailed beast; we are here to rescue you and teach you how to draw Kurama Naruto with our step-by-step drawing tutorial.
Step 01: First, start with his tail; draw Kurama’s furry tail
Step 02: In this step, draw his second tail
Step 03: Done with the second tail, then draw his 3rd tail
Step 04: It’s time to draw his 4th tail
Step 05: To further continue to draw his 5th tail and follow the tail guide properly.
Step 06: Now draw his 6th tail
Step 07: While drawing tails, take care of minor detailing, so draw his 7th tail
Step 08: You’re almost at the end of your drawing; draw his 8th tail
Step 09: When you’re done with all 8th tails, it’s time for his face; draw his face and features
Step 10: Do you need to remember to draw his body? Draw his body and legs
Step 11: When you draw the face then, remember that to draw his eyes
Step 12: At the end, don’t forget to draw his 9th tail at the end
Step 13: Your 9th tail beast sketch is ready. Fill in the color in his drawing, and then you’re finally done with it.
Rock lee is an optimistic, energetic, hot-blooded ninja in the Naruto series.
He shows strong commitment and dedication toward his promises.
So we are here to give you an impression of his character with our drawing tutorial on how to draw rock-lee.
By drawing his optimistic personality, you should learn the detailing of his character, and when you follow the steps carefully.
Step 01: First of all, draw Rock lee head
Step 02: While drawing his head, also draw wavy lines on his head
Step 03: Remember that to sketch his face and neck
Step 04: To add expression, draw his facial features
Step 05: Don’t you want to dress him? So draw his suit
Step 06: It’s time to draw his hand and bandage
Step 07: Now wrap up his dress, so complete his dress
Step 08: To make the dress highlighted and prominent draw lines on his dress
Step 09: At this point, you’re done with drawing the hit-blooded ninja Rock lee from Naruto world. Fill in the color in his drawing to see the final look.
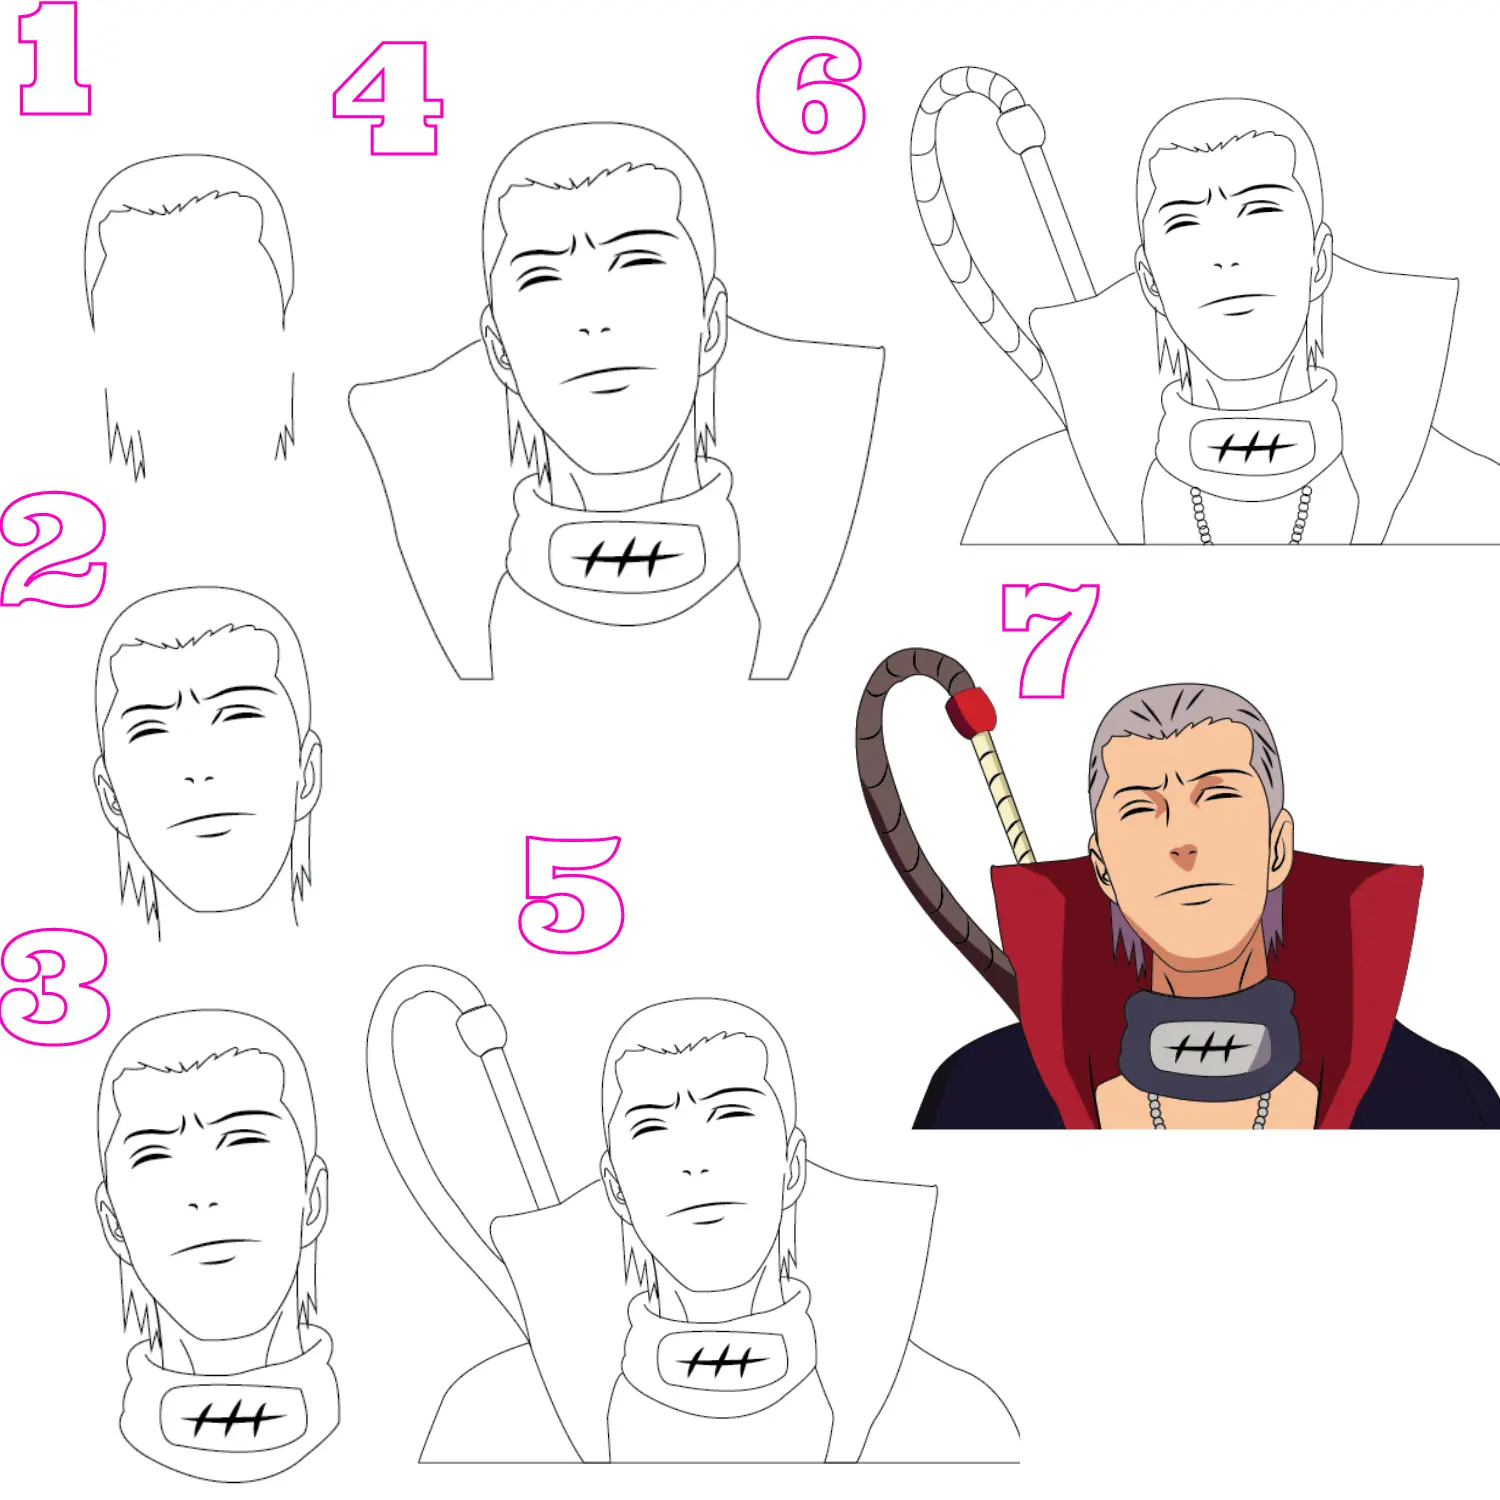
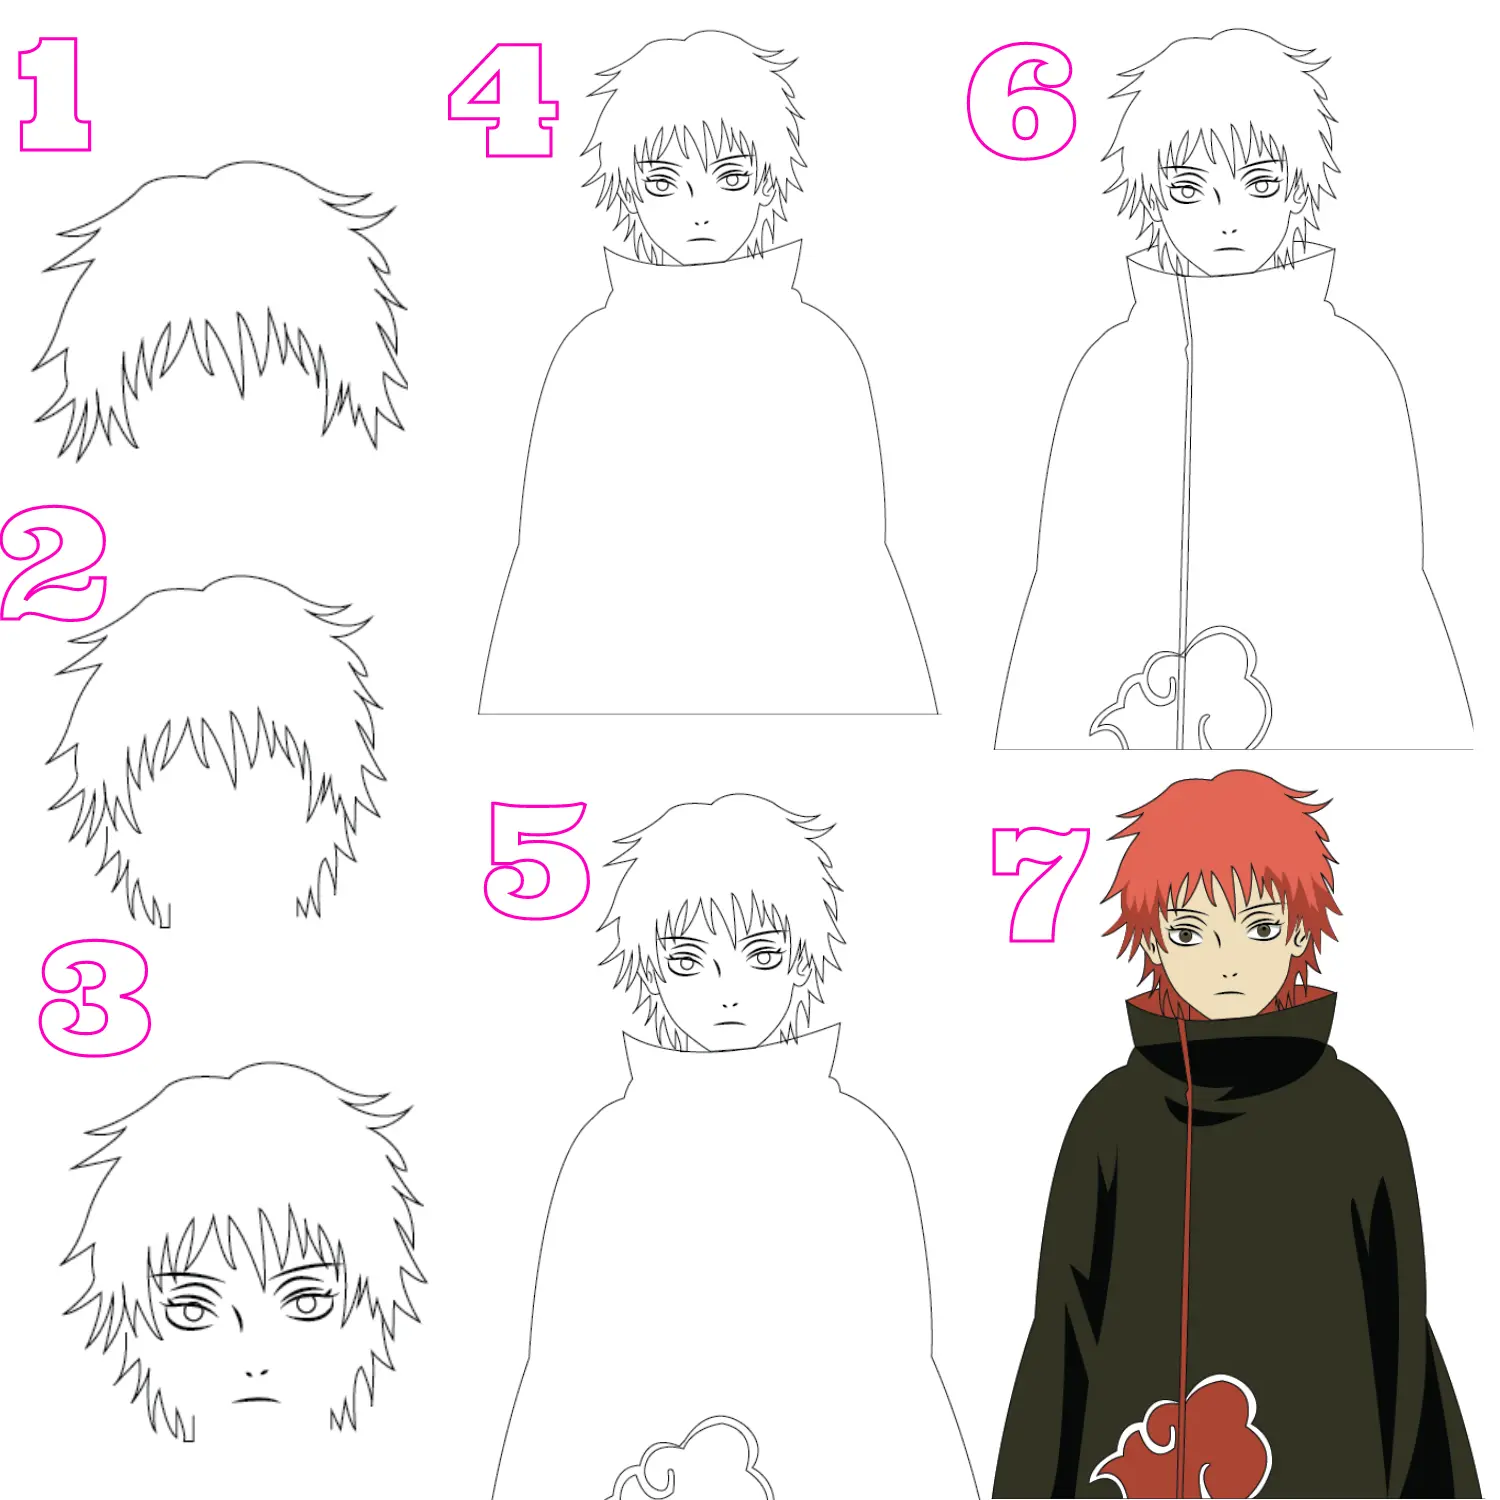
Hidan is a member of the criminal organization Akatsuki and belongs to the land of hot water.
In the series, it seems impossible to kill him because of his exceptional powers. It’s quite interesting to draw him. So follow our steps to learn how to draw his character without difficulty.
Step 1: In the first step, draw his head
Step 2: After head drawing now, outline his hair
Step 3: In this step, draw his ears
Step 4: Remember that to draw his facial features
Step 5: While drawing facial features, don’t forget to draw his face line
Step 06: When done with the face, it’s time to draw his neckline
Step 07: Draw his forehead band, as it’s an important part of Hidan’s personality
Step 08: Focus on minor detailing on his headband, so draw a cut on his band
Step 09: It’s time to dress him, draw his outfit
Step 10: After that, draw his shoulders
Step 11: Don’t forget to sketch his blade
Step 12: This step is all about drawing his necklace
Step 13: At the end, draw lines on his blade
Step 14: Cheers! Finally, you’re done with the Hidan drawing. Fill in the color in his drawing.
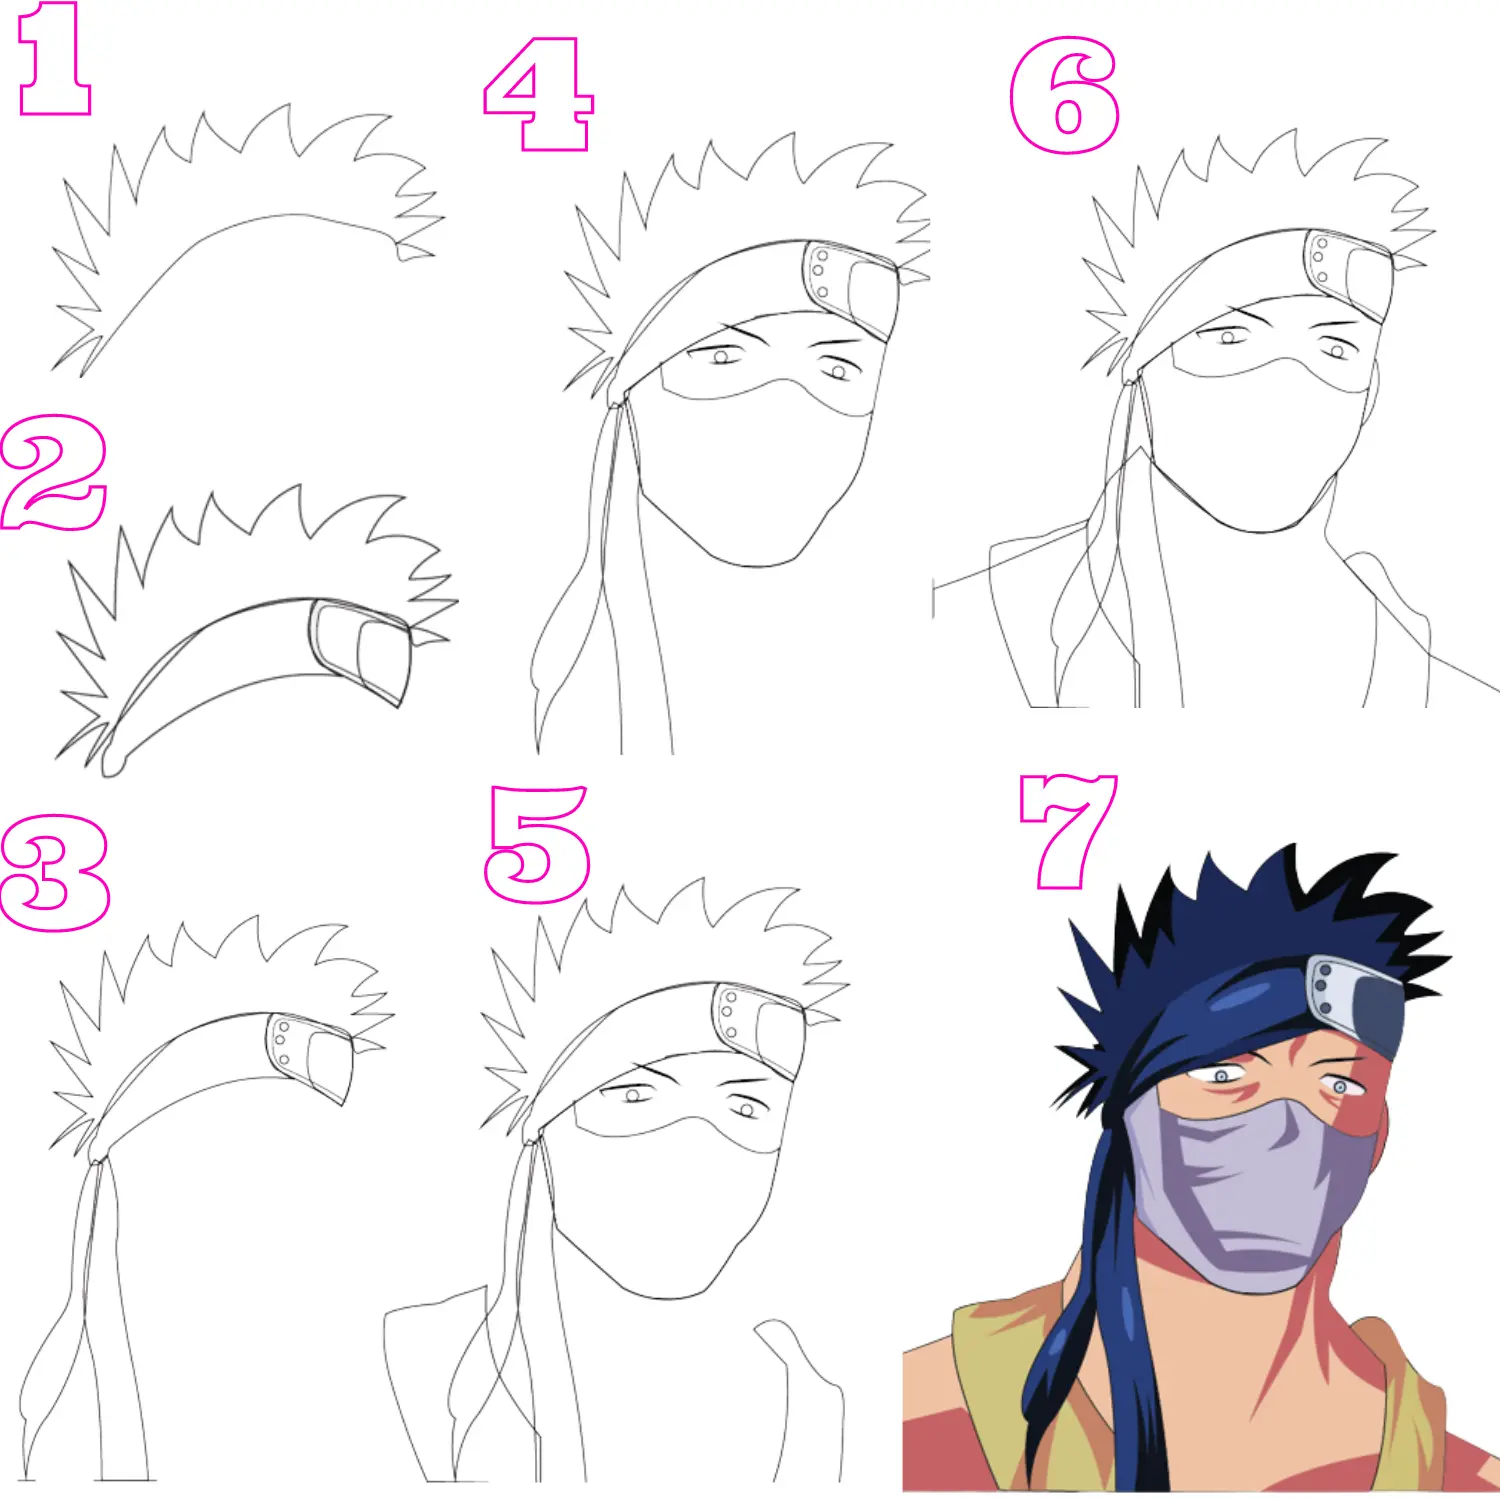
Zabuza Naruto is a high-ranking ninja and a powerful fighter in the Naruto anime series.
He belongs to the hidden mist village and becomes one of the seven shinobi swordsmen of the mist. To draw this powerful fighter, follow our step guide to sketch his character.
Step 1: First, draw Zabuza’s hair
Step 2: Furthermore, now draw his head protector
Step 3: While drawing the head protector, draw two of his strands on the Zabuza protector
Step 4: Moving onwards, now it’s time to draw his mask
Step 5: In this step, you all need to draw his eyes and eyebrow
Step 6: Now it’s time to outline his face
Step 7: Done with the above step. At this point, draw his shirt
Step 8: Lastly, don’t forget to draw his neck and shoulders
Step 09: To sum up Zabuza’s character, do the coloring in his drawing
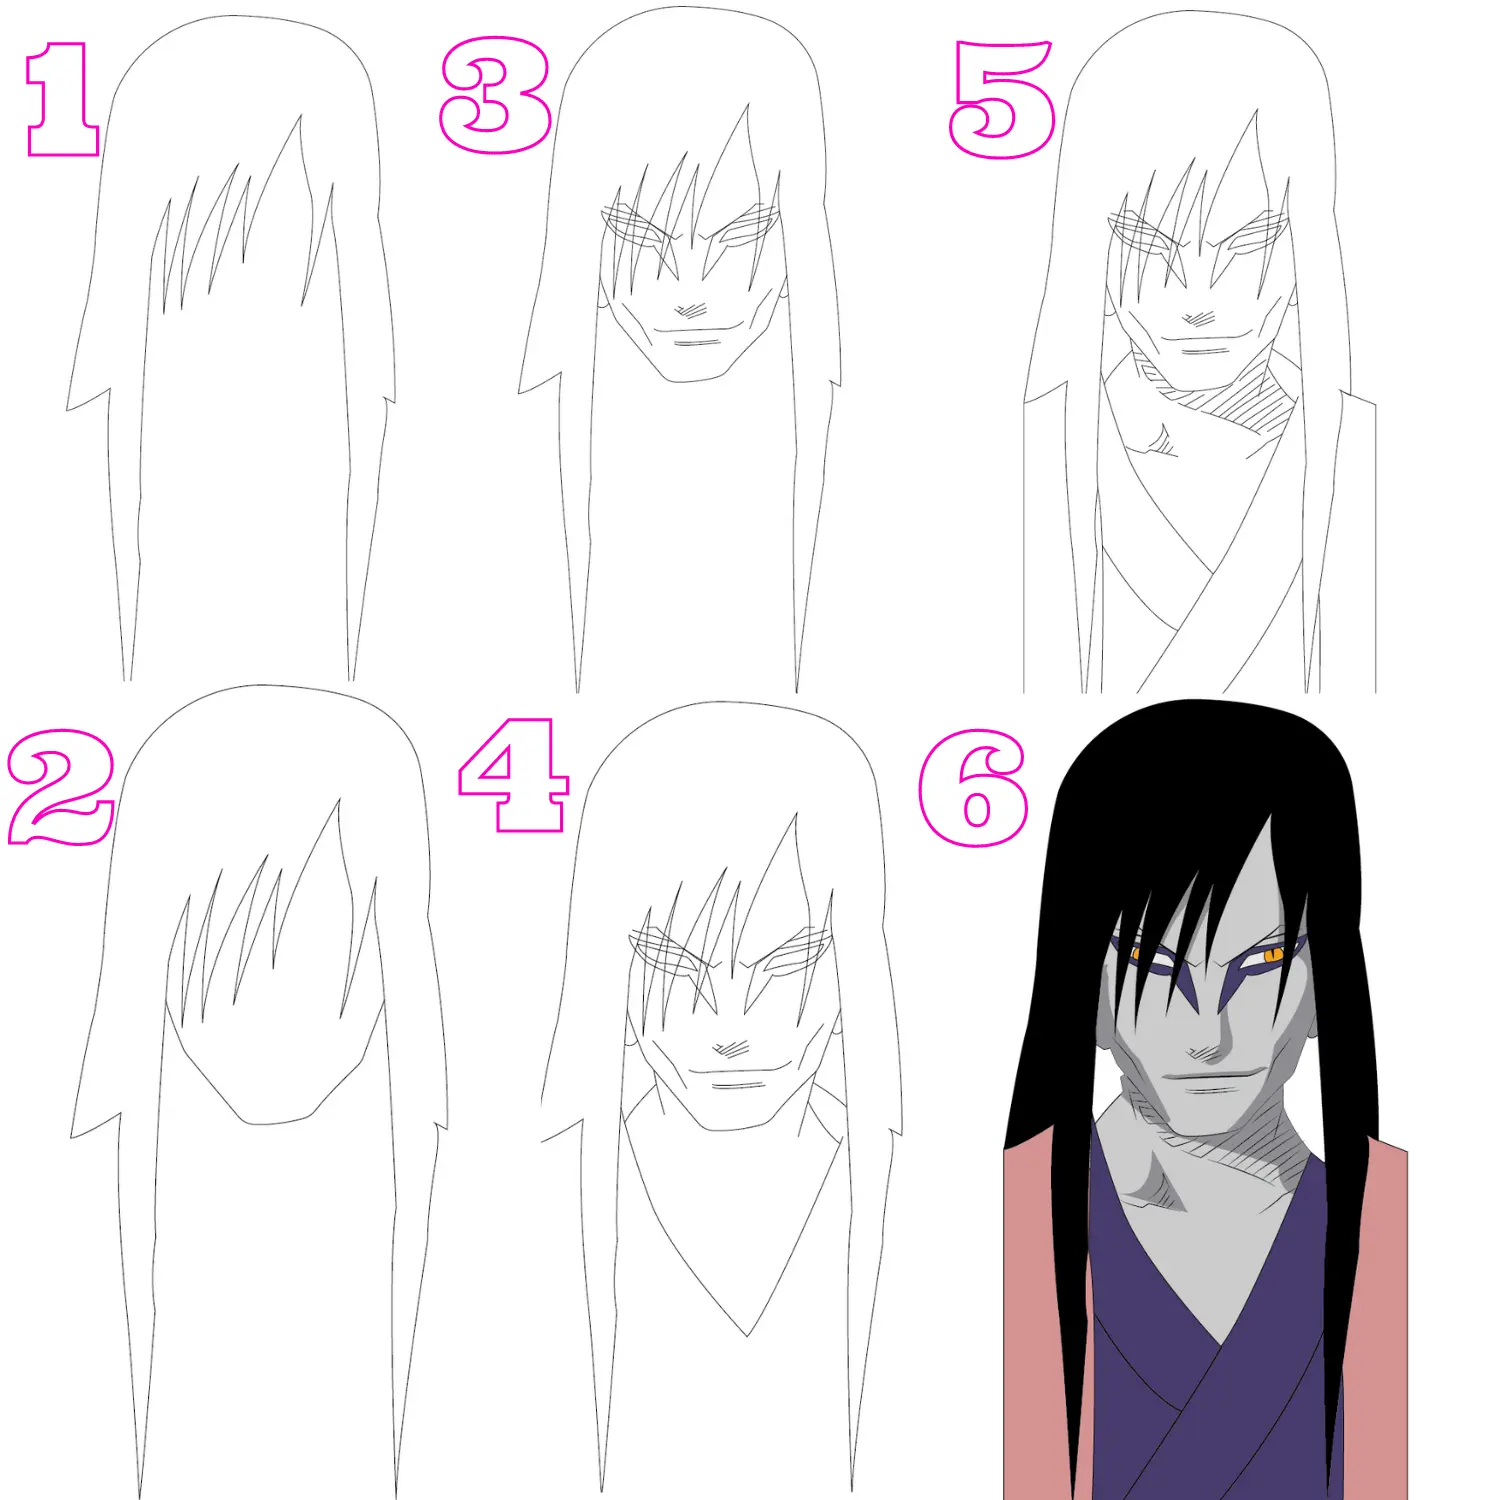
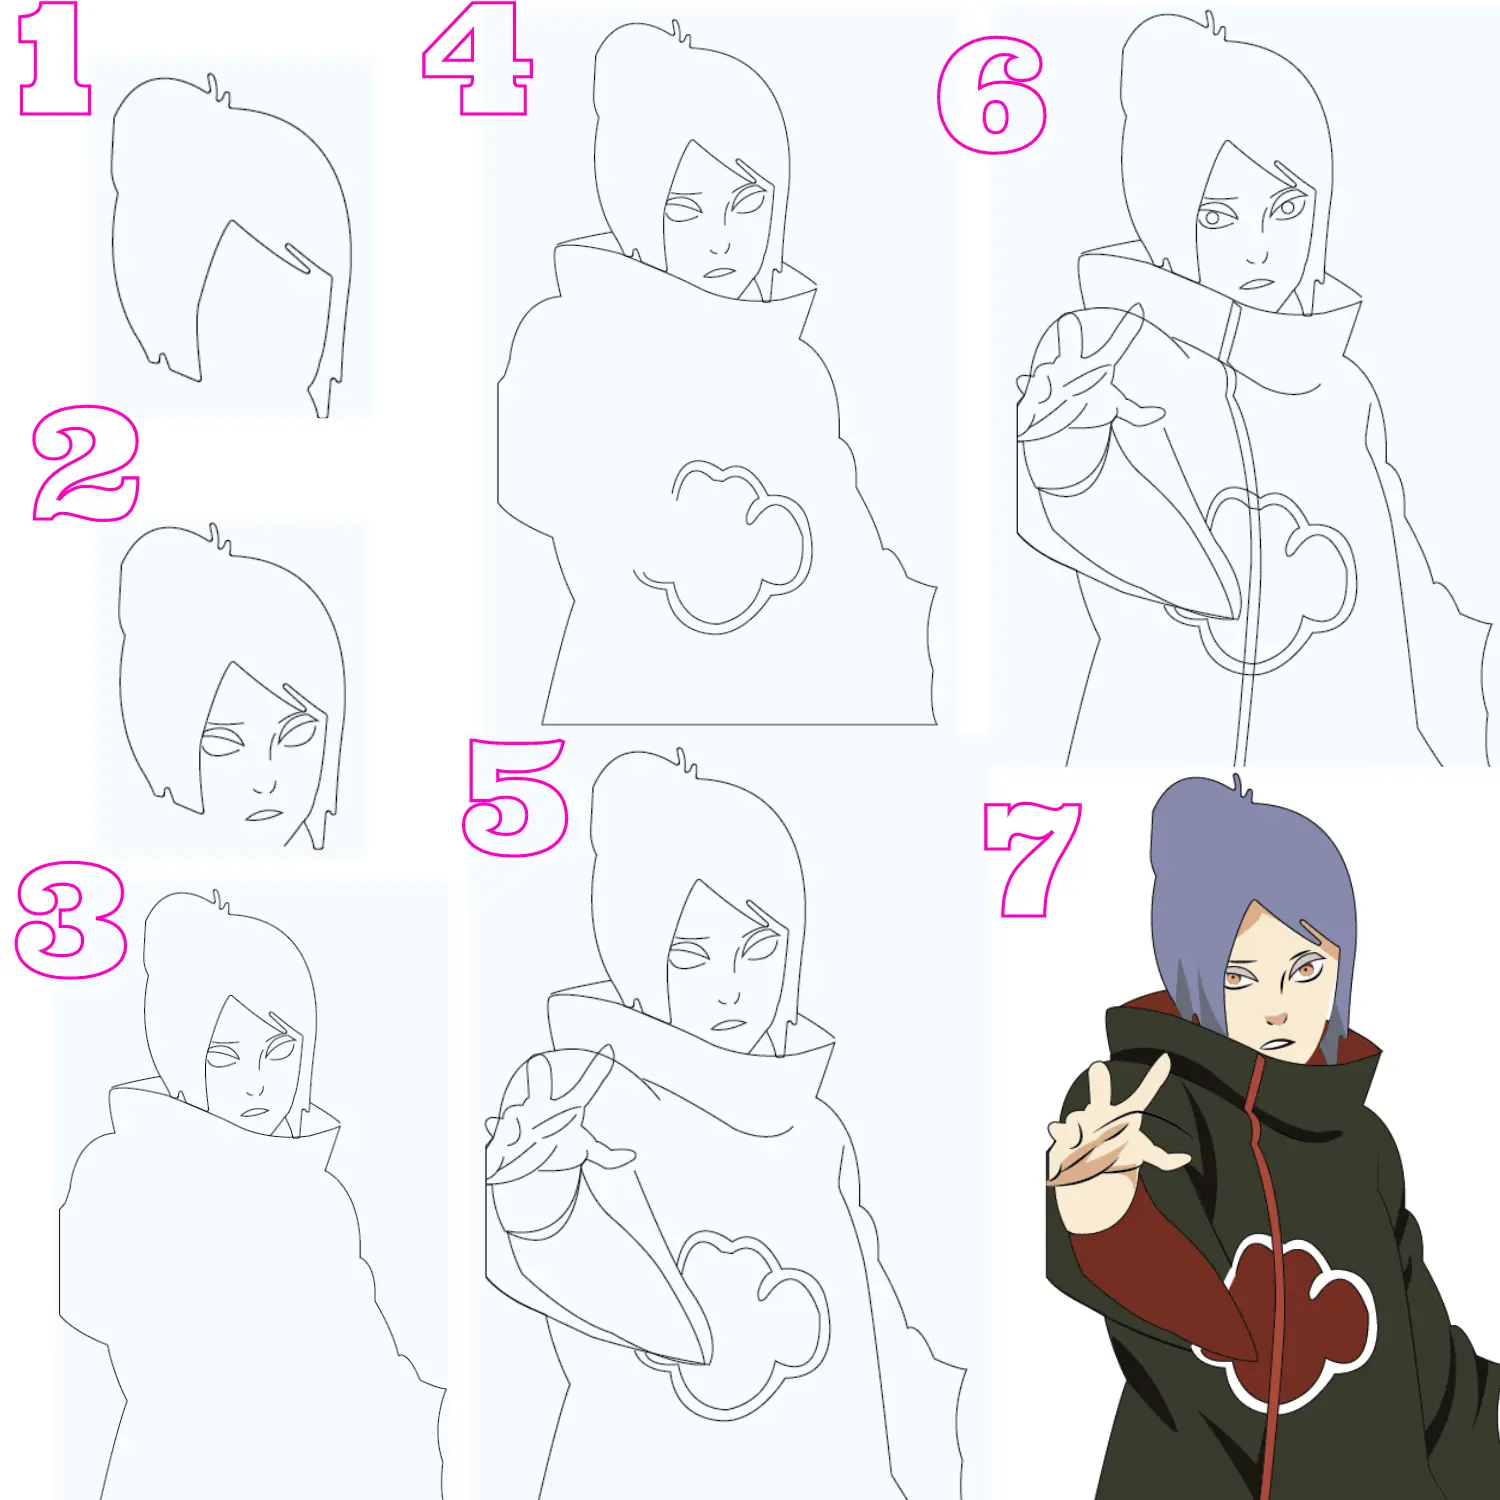
Sasori is one of the antagonists in the Naruto series.
Sasori is also known as Sasori of the red sand and belongs to a Hidden Sand Village (Sunagakure). So do you want to draw this antagonist with us? We will teach you how to draw Sasori with our easy drawing guide.
Step 1: First of all, draw Sasori’s mousy hair
Step 2: In this step now, complete his hair
Step 3: Moving to his eyes, draw his left eye
Step 4: When done with left eyes then is time to draw his right eyes
Step 5: After completing the eyes, draw his facial features. Which is an important part of his character
Step 6: Simply draw his chin
Step 7: Finally completing the above step, now its time to outline the shape of his dress
Step 8: Remember to draw his cloak sign.
Step 9: While drawing the dress, also draw his zip-line
Step 10: At the end, draw his collar line
Step 11: Now you completed the drawing of Sasori from the Naruto anime series. Do the coloring in his drawing.
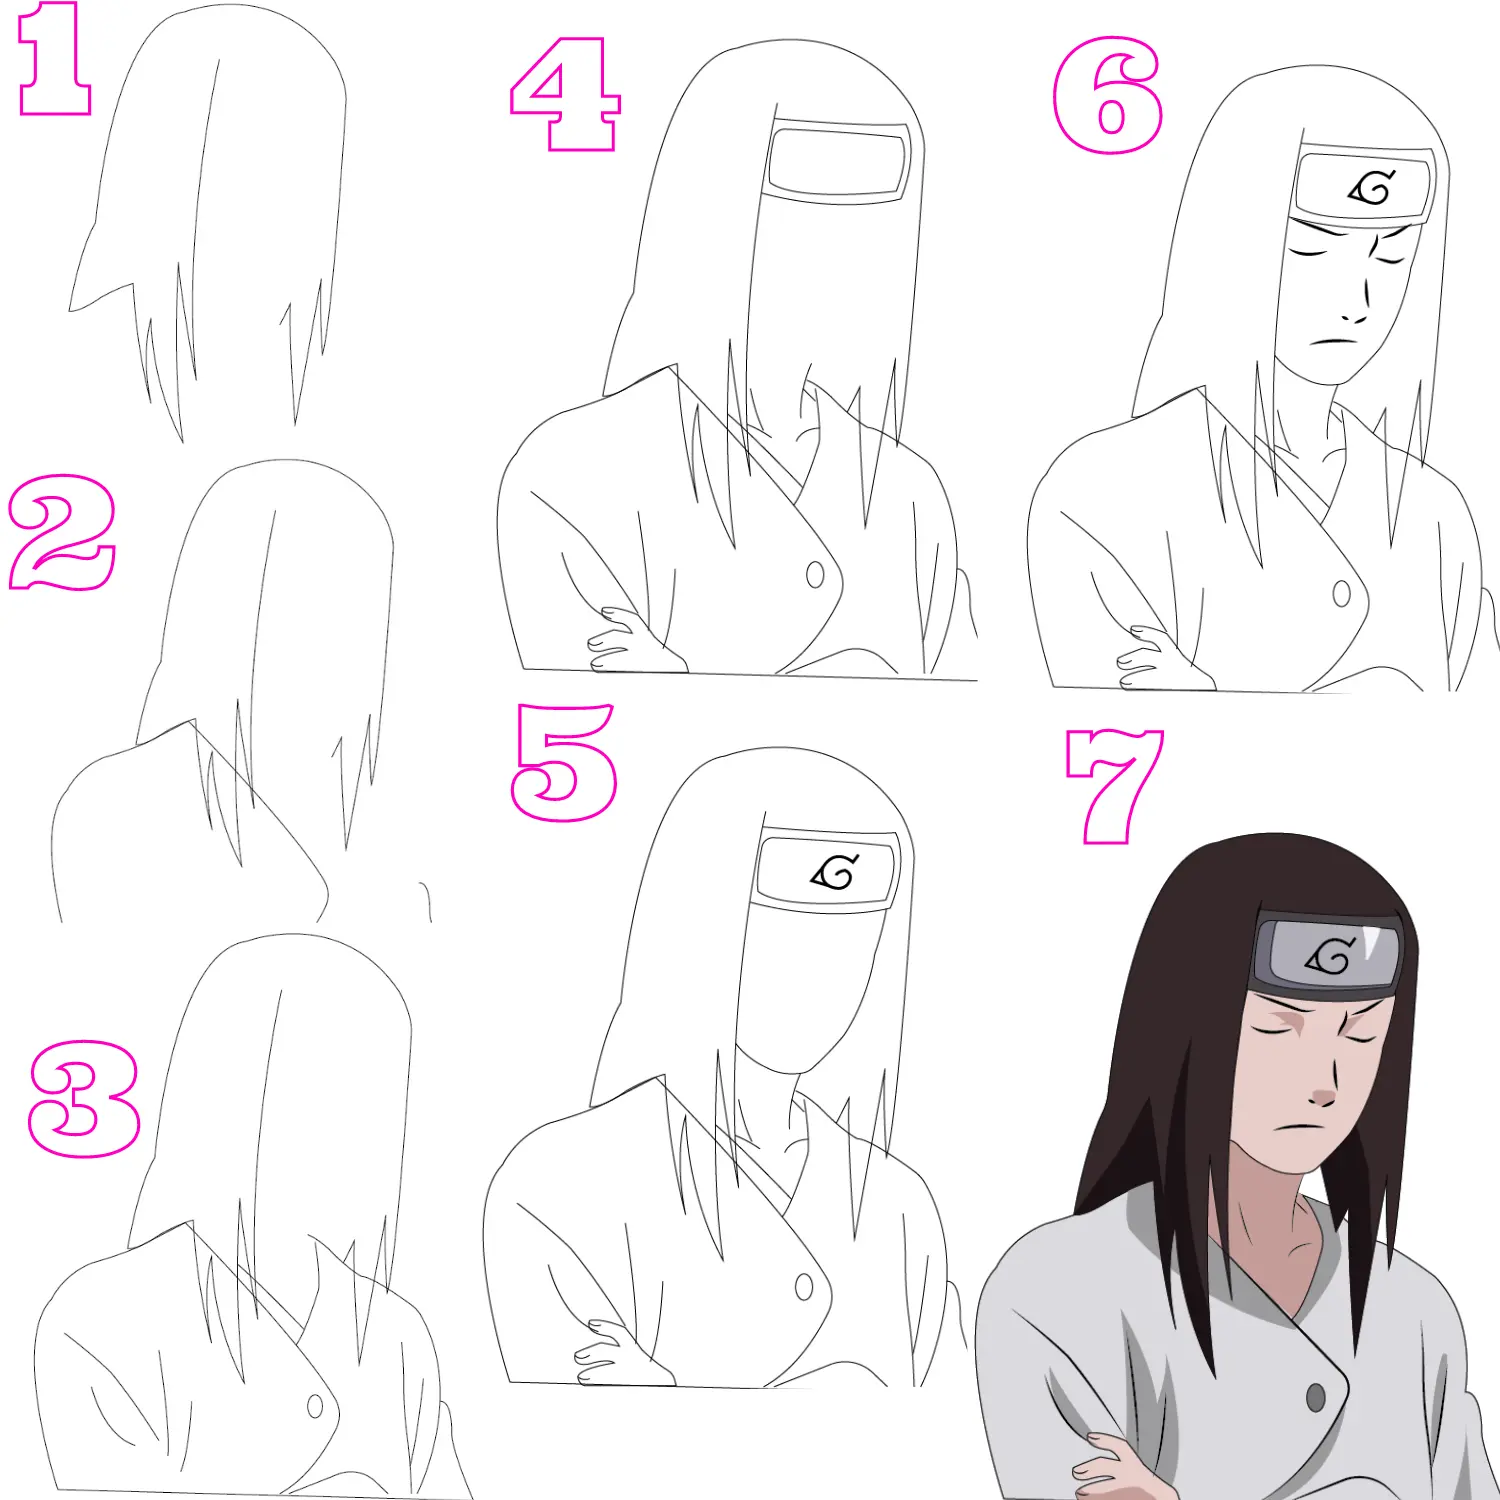
Neji Hyuga is one of the strongest shinobiin the Naruto anime series, and he has a supporting character in the series.
He is considered the strongest and most genius ninja by many. In our drawing tutorial, we will guide you on how to draw Neji Hyuga drawing step by step.
Step 1: Firstly, draw Neji’s hair.
Step 2: Further continuing draw each side of his dress.
Step 3: After one side of the dress drawing, now draw the left side of his dress.
Step 4: It’s time to draw his hand.
Step 5: Remember that to draw his headband.
Step 6: While drawing the headband, also sketch the symbol on his protector and concentrate on minor detailing.
Step 7: This step is all about sketching his face.
Step 8: To give expressions, draw his facial features.
Step 9: At last, add colors to Neji Hyuga’s drawing, and you complete it.
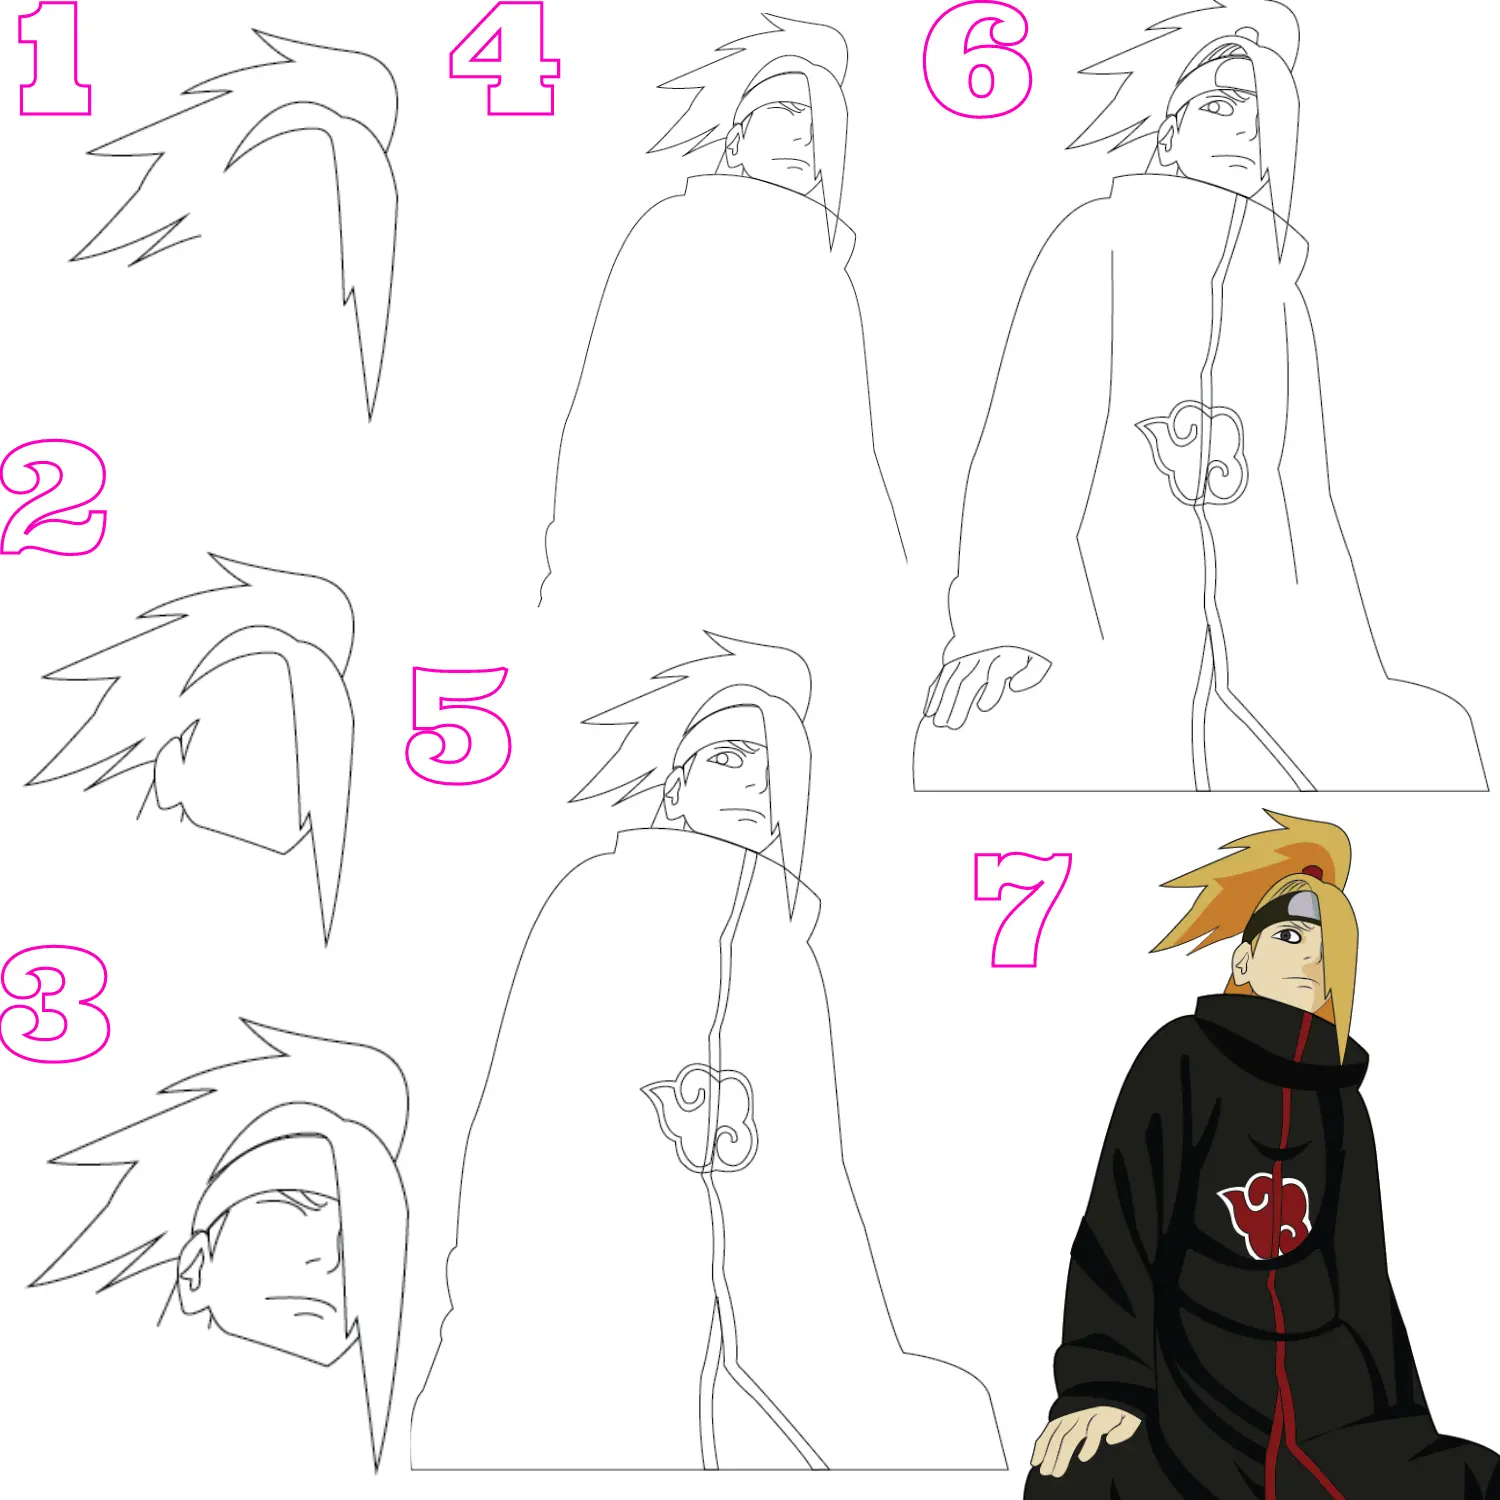
Deidara is a powerful and intelligent ninja and belongs to a hidden village. He is also a member of the criminal organization Akatsuki. In our tutorial, we will guide you on how to draw his character by following our simple steps.
Step 1: Mainly draw Deidara’s hair.
Step 2: Furthermore, it’s time to sketch his face line.
Step 3: After the sketch of the face line now, draw his headband.
Step 4: To add a bright expression, draw his facial features.
Step 5: In this step, he turns to draw his cloak.
Step 6: To enhance the cloak, draw a lining on his cloak.
Step 7: Moving back to the face, draw his eyeball and cloud on his outfit.
Step 8: In this step, sketch his symbol on the head protector.
Step 9: Moving to the body parts draw his arms.
Step 10: After arms drawing, now is time to draw his hand.
Step 11: Yeah, finally, you have completed your Deidara character drawing. Fill in some colors in his drawing, and you’re done.
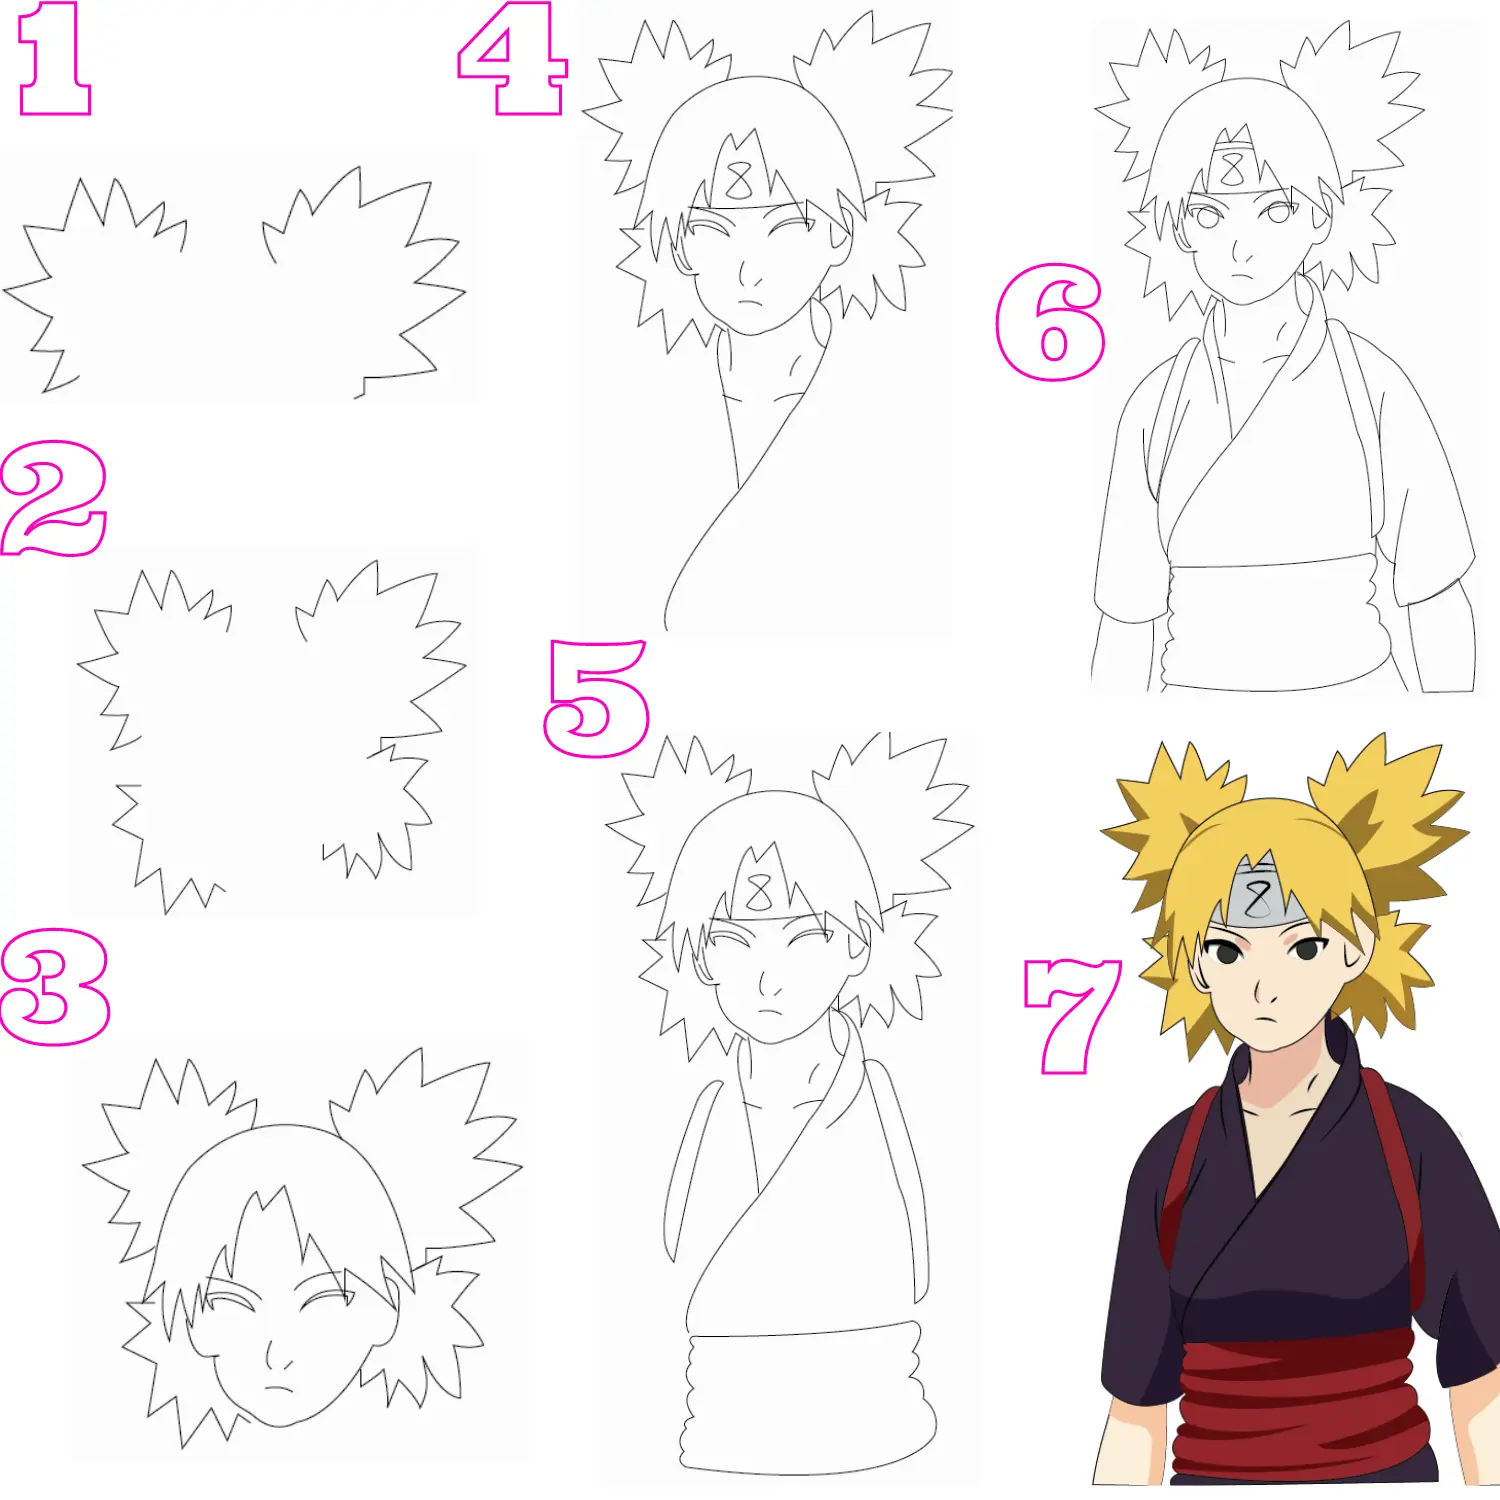
She is a kunoichi and a member of Sunagakure’s Kazekage clan. In our tutorial on Temari Nara drawing, we will teach you how to draw his character with our step-by-step guide.
Step 1: First of all, start to draw her hair.
Step 2: When drawing her hair, also draw her downward hair.
Step 3: In this step, it’s time to draw her front hair.
Step 4: Don’t dismiss from mind drawing her facial features.
Step 5: The headband is an important part of Temari’s character so draw her headband.
Step 6: Simply outline her neckline.
Step 7: It’s time to dress her, so draw her dress.
Step 8: Coming back to face, naturally draw her eyeballs.
Step 9: Moving to the body part, draw her right arm.
Step 10: While drawing her right arm, don’t forget to draw her left arm.
Step 11: Yippee, you have completed the talented, skilled kunoichi drawing. Now fill color in her drawing, and you’re done.
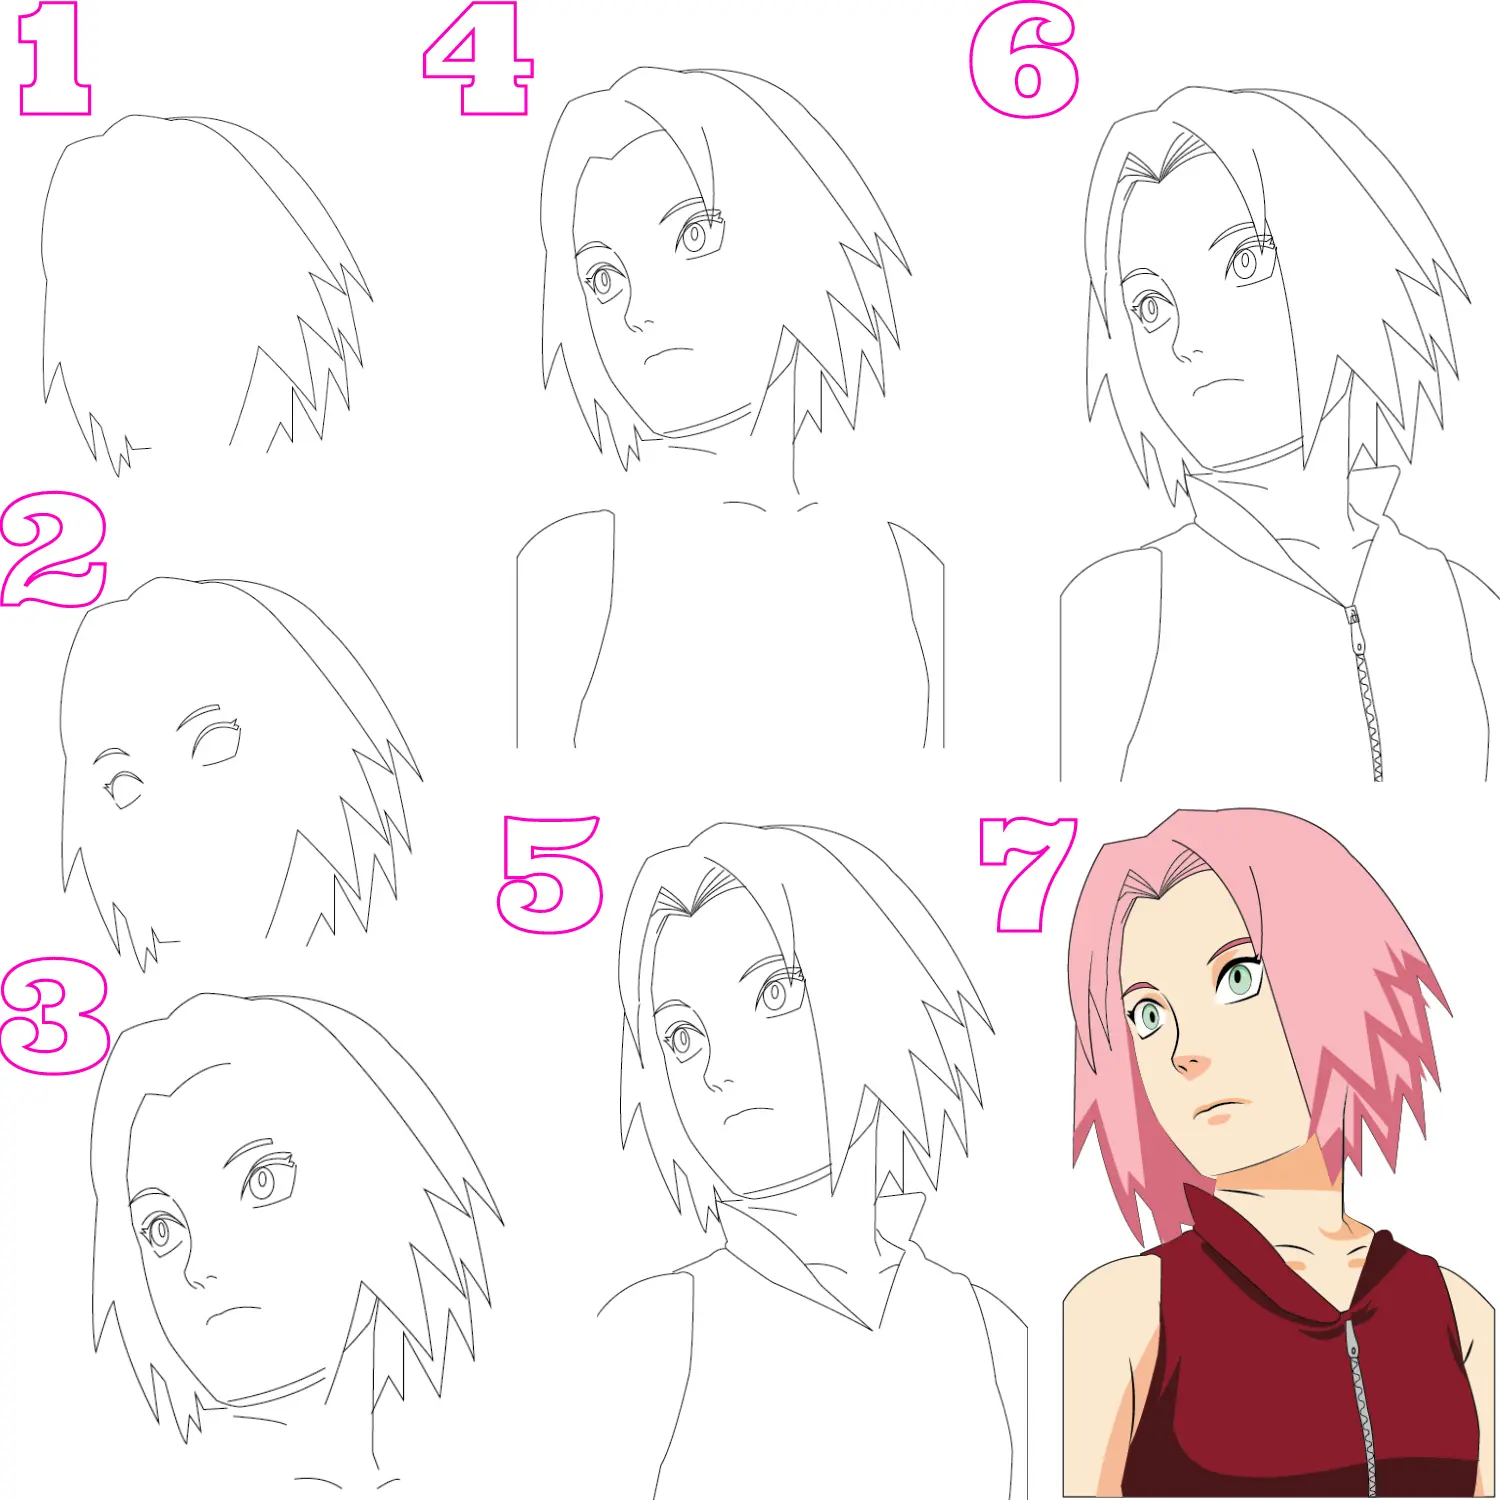
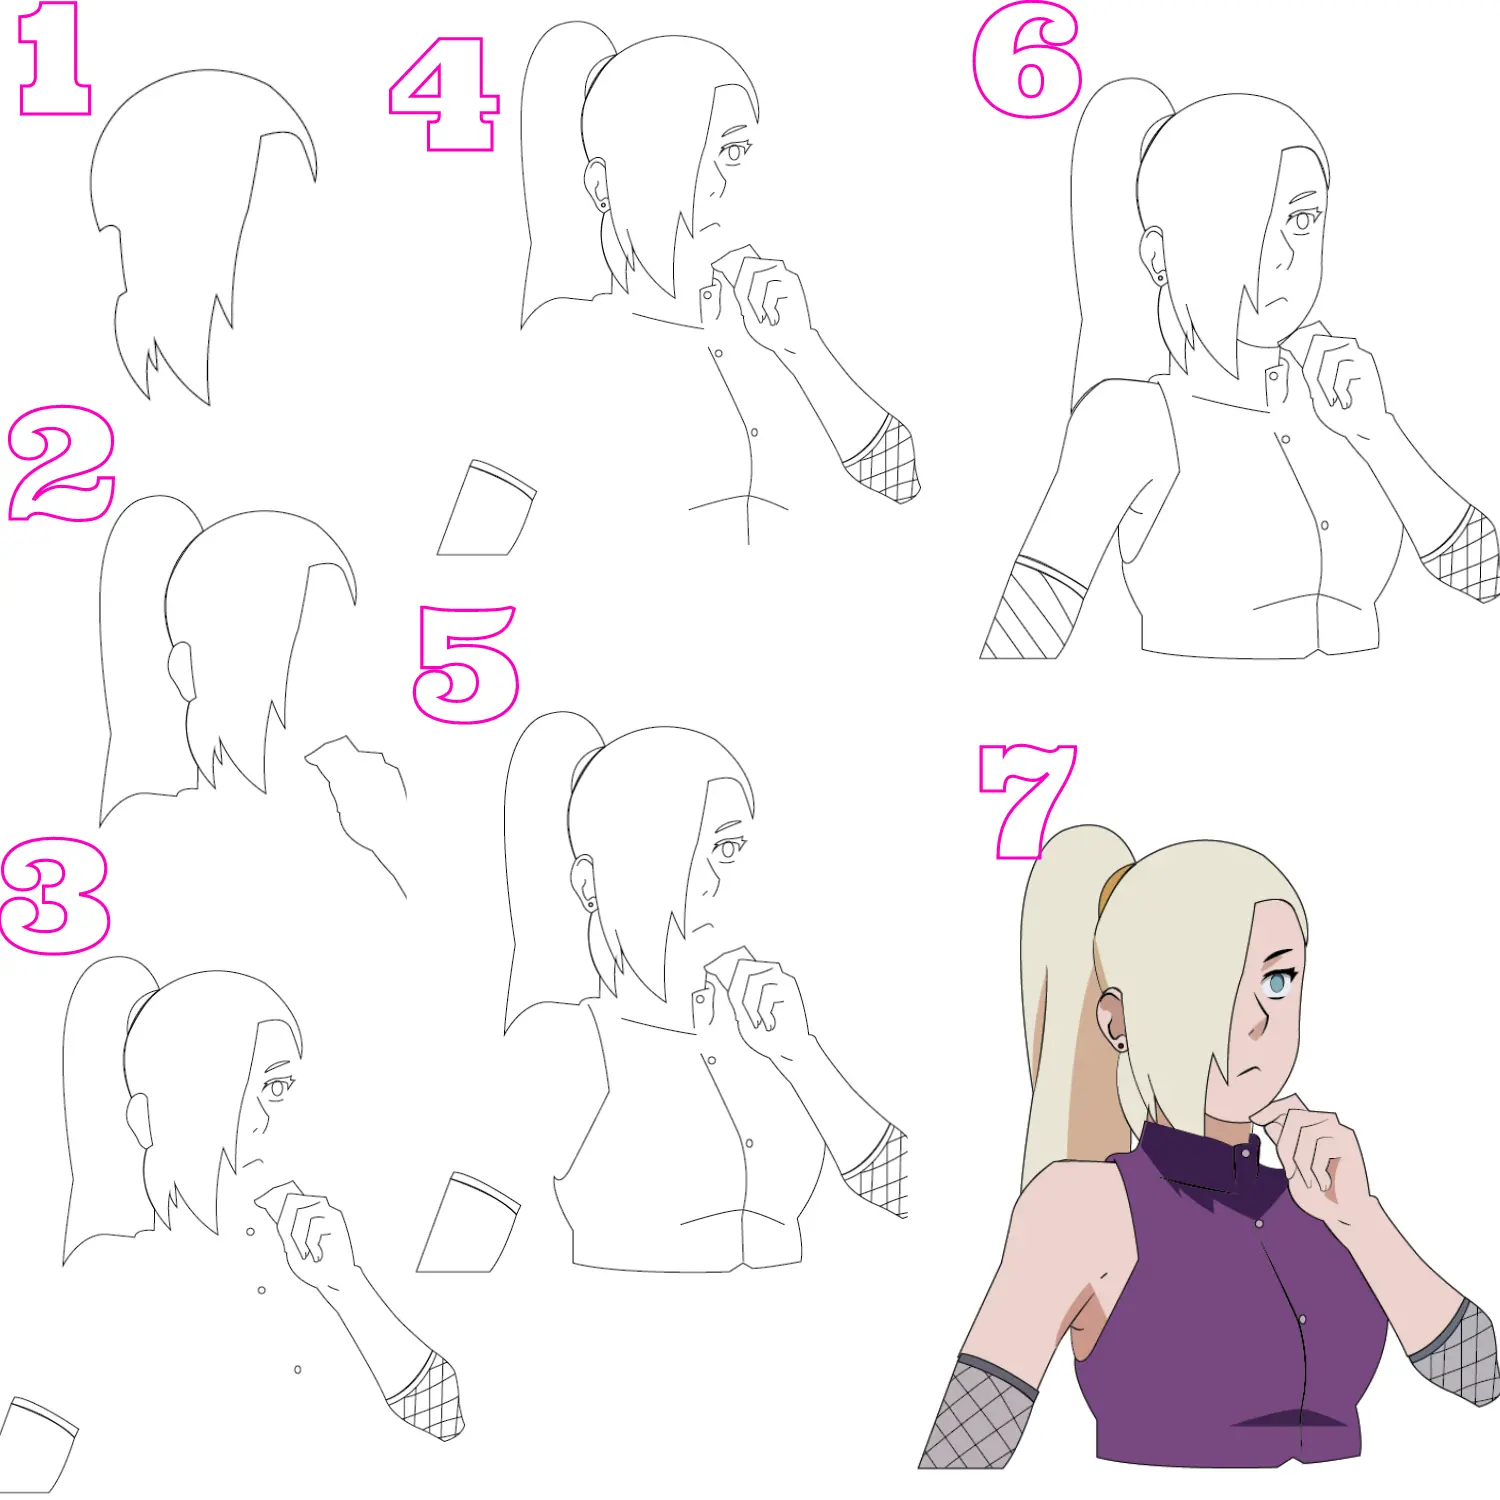
She is a member of team 7, including a teammate of Naruto Uzumaki. So do you want to sakura Haruno? Then our step-by-step tutorial will help you to draw her character.
Step 1: Draw sakura hair.
Step 2: In this step, all you need to do is to draw her 2nd layer of hair.
Step 3: Keep in mind that to draw her eyes.
Step 4: Add facial features to her character. As it’s an important part of her personality.
Step 5: After completing the facial features now, sketch her face line.
Step 6: Moving to the upper body parts, now draw her arms and highlight her hair.
Step 7: At this point, draw the collar of the outfit.
Step 8: Last but not least, don’t forget to draw the zip line of the dress.
Step 9: Finally, you’re done with the drawing of Sakura Haruno. Add some colors to her drawing and see the final look.
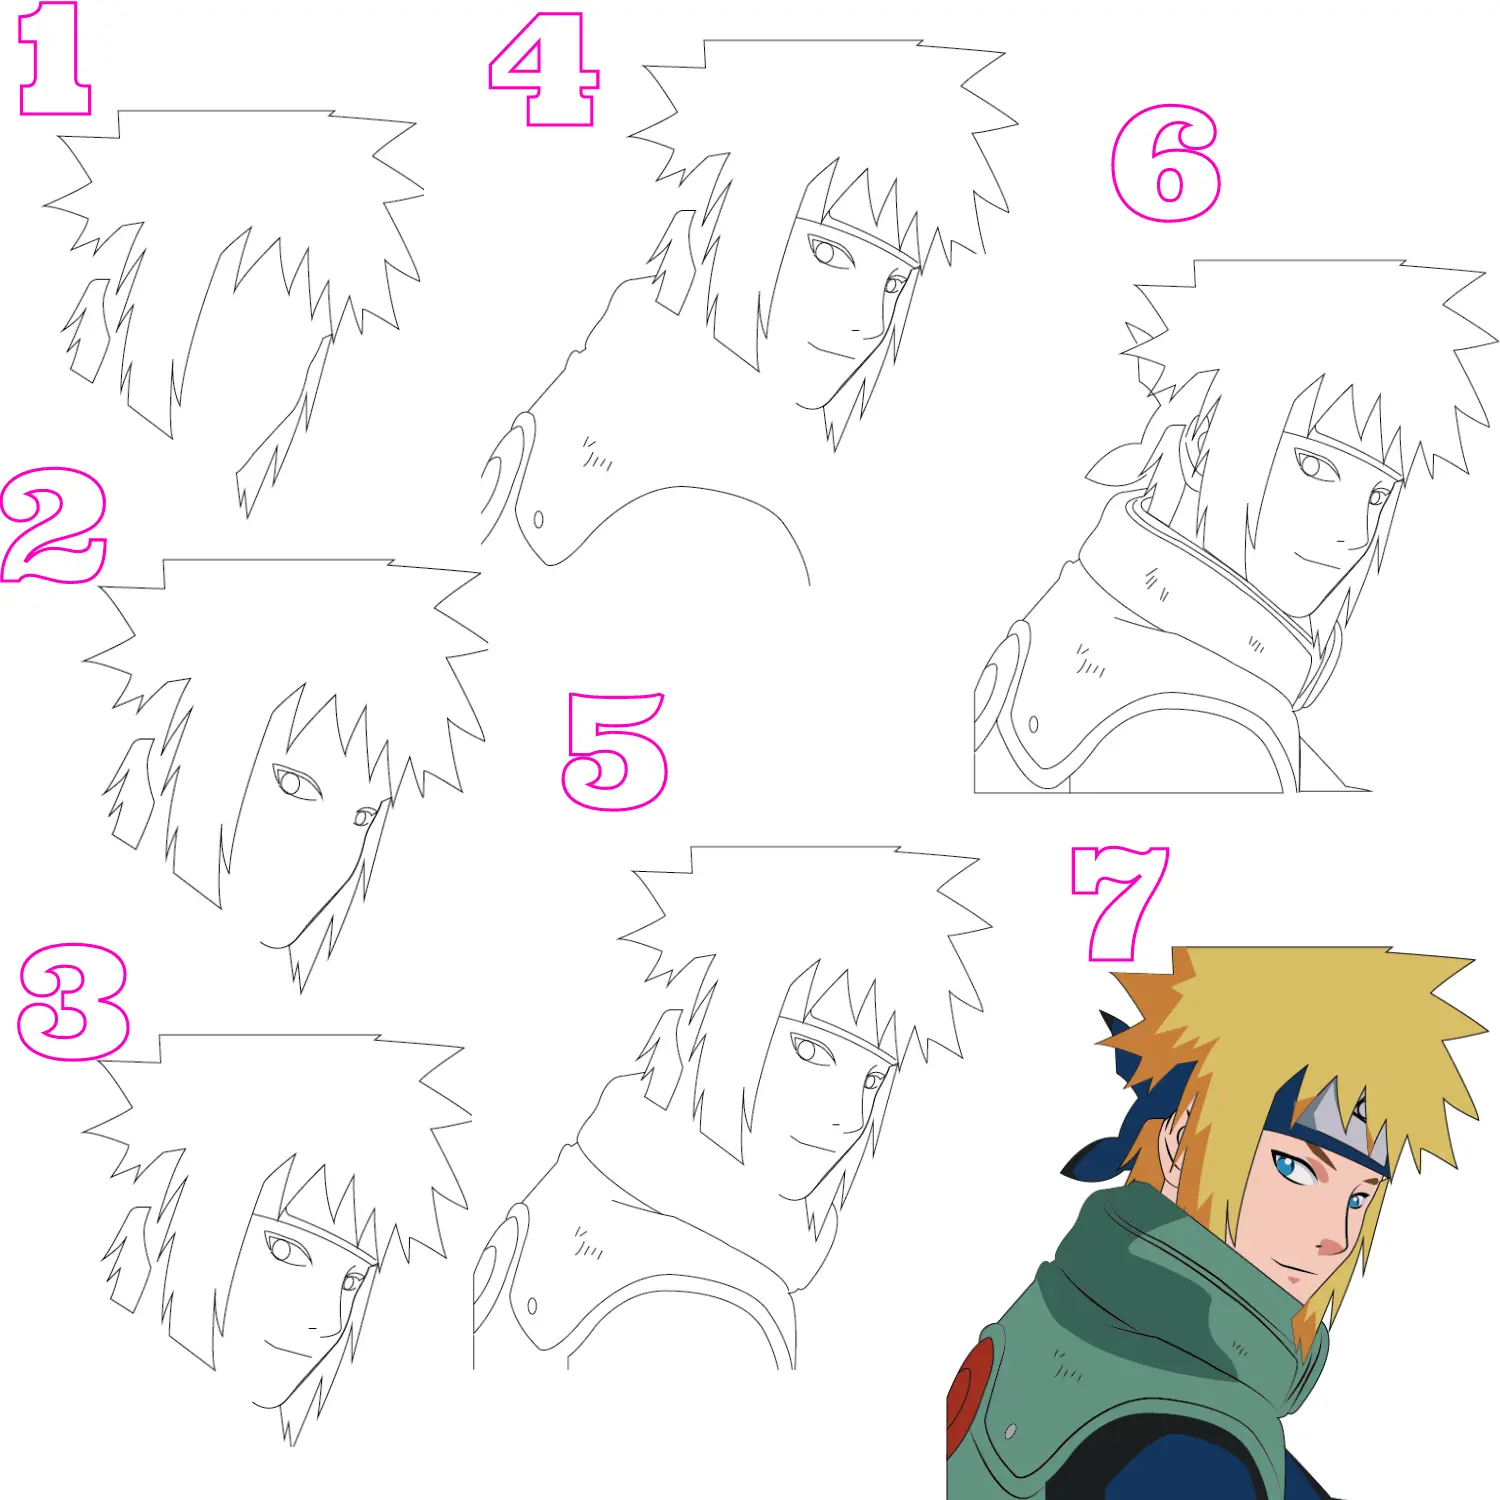
Minato Namikaze is a very humble and collected man and was the father of Naruto Uzumaki.
He is one of the main supporting characters of the Naruto anime series. Our drawing guide will help you learn how to draw Minato Namikaze with our easy steps.
Step 1: First of all, draw his hair.
Step 2: In this step, draw his eyes.
Step 3: Furthermore, don’t forget to draw facial features and a head protector.
Step 4: Now dress the Minato, so sketch his jacket.
Step 5: While drawing the jacket, also draw the shape of his jacket collar.
Step 6: At last, outline his ear and the opposite side of the headband.
Step 7: Yeah, your sketch is completed without any doubts. Now is the time to fill in the colors in his drawing, and you’re done.
Ino yamanaka is a powerful kunoichi of Konohagakures Yamanaka clan.
She is one of the supporting characters in the Naruto series. She is the kunoichi of the hidden leaf village. Our drawing guide will teach you how to draw his character with our step-by-step tutorial.
Step 1: Firstly, draw her hair.
Step 2: After hair drawing, move onward to draw the shape of her ponytail and arm.
Step 3: In this step, draw her fingers and right arm.
Step 4: Draw her left arm warmer.
Step 5: Don’t forget to draw her facial features and the blouse button.
Step 6: Now dress up Ino by sketching her Dress.
Step 7: This step is all about joining her arm and blouse.
Step 8: Finish her character by drawing her right arm warmer.
Step 9: Hyee, finally, your Ino character is victoriously complete. Add some colors to her drawing to make it more attractive.
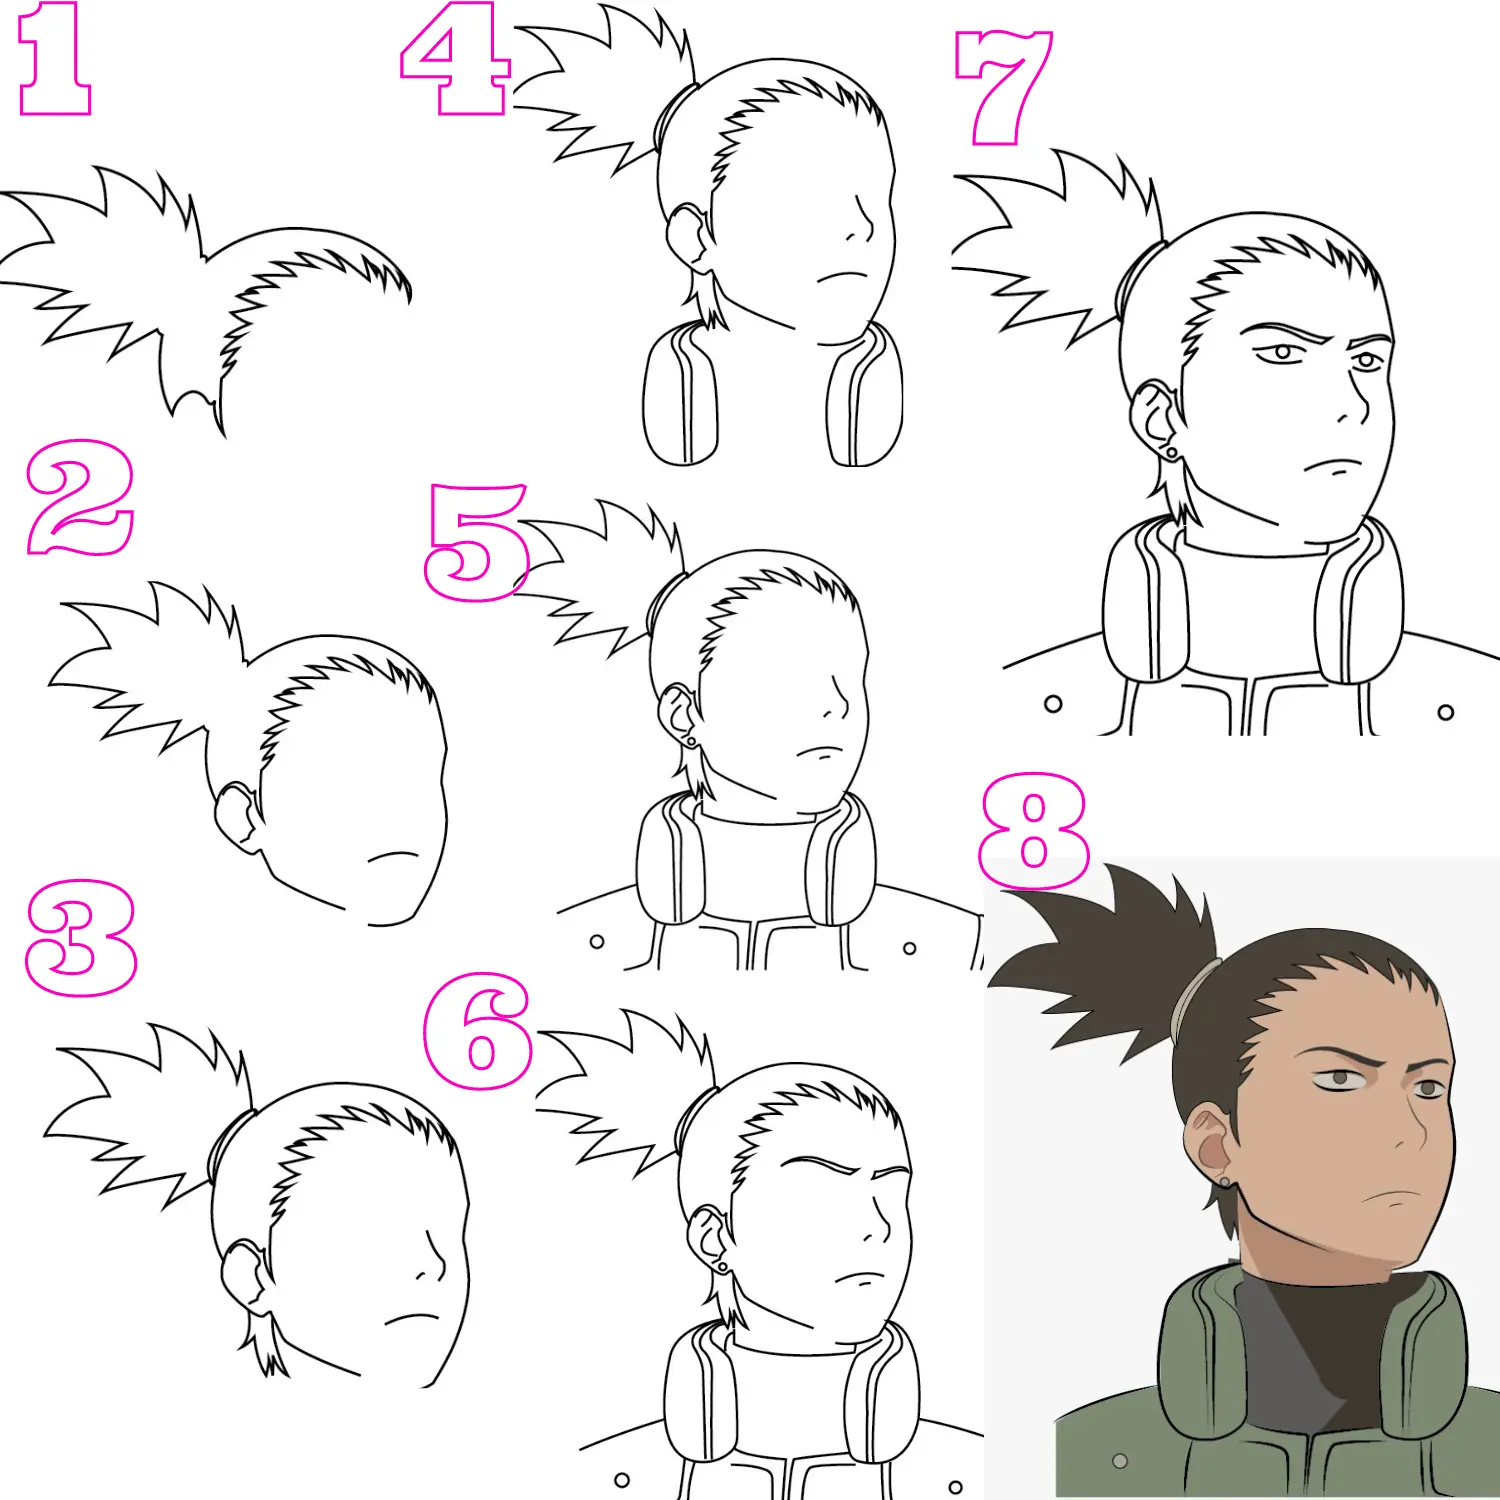
Shikamaru Nara is one of the main characters from the Naruto anime series.
He is an intelligent, strongest ninja and a shinobi from Konohagakure’s Nara clan. With us, you will draw step by character step by following our drawing guide.
Step 1: Firstly, draw Shikamaru’s hair
Step 2: Now it’s time to draw his ear
Step 3: After his ear drawing, it’s all about outlining the face line
Step 4: Sketch his nose
Step 5: Keeping in mind to draw his lower side hair
Step 6: When with the face now it turns to draw the neckline of the dress
Step 7: While neck drawing, don’t forget to draw his shoulder lines
Step 8: Moving back to the face, draw his eyebrow
Step 9: After eyebrows drawing, draw his eyes
Step 10: Hurrah. Finally, you completed the most amazing Shikamaru character. Add color to his drawing, and you’re all wrapped up.
Finally, in this ultimate drawing guide, you learn all the information and details about the “Naruto Main Characters Drawings.”
Moreover, with our individual detailed tutorials on every character (links available with each character above), you will get the unexceptional knowledge and drawing guide.
By reading and following our drawing guide, you will become an artist to draw all Naruto characters with great proficiency and skills.
Please let us know which one is your favorite.
Let us know in the comment section which one you have drawn along with us from the entire “Naruto Shippuden Characters Drawings Guide”.


")
")


